Projects

Automata Lab

GitHub

TypeScript React Vite

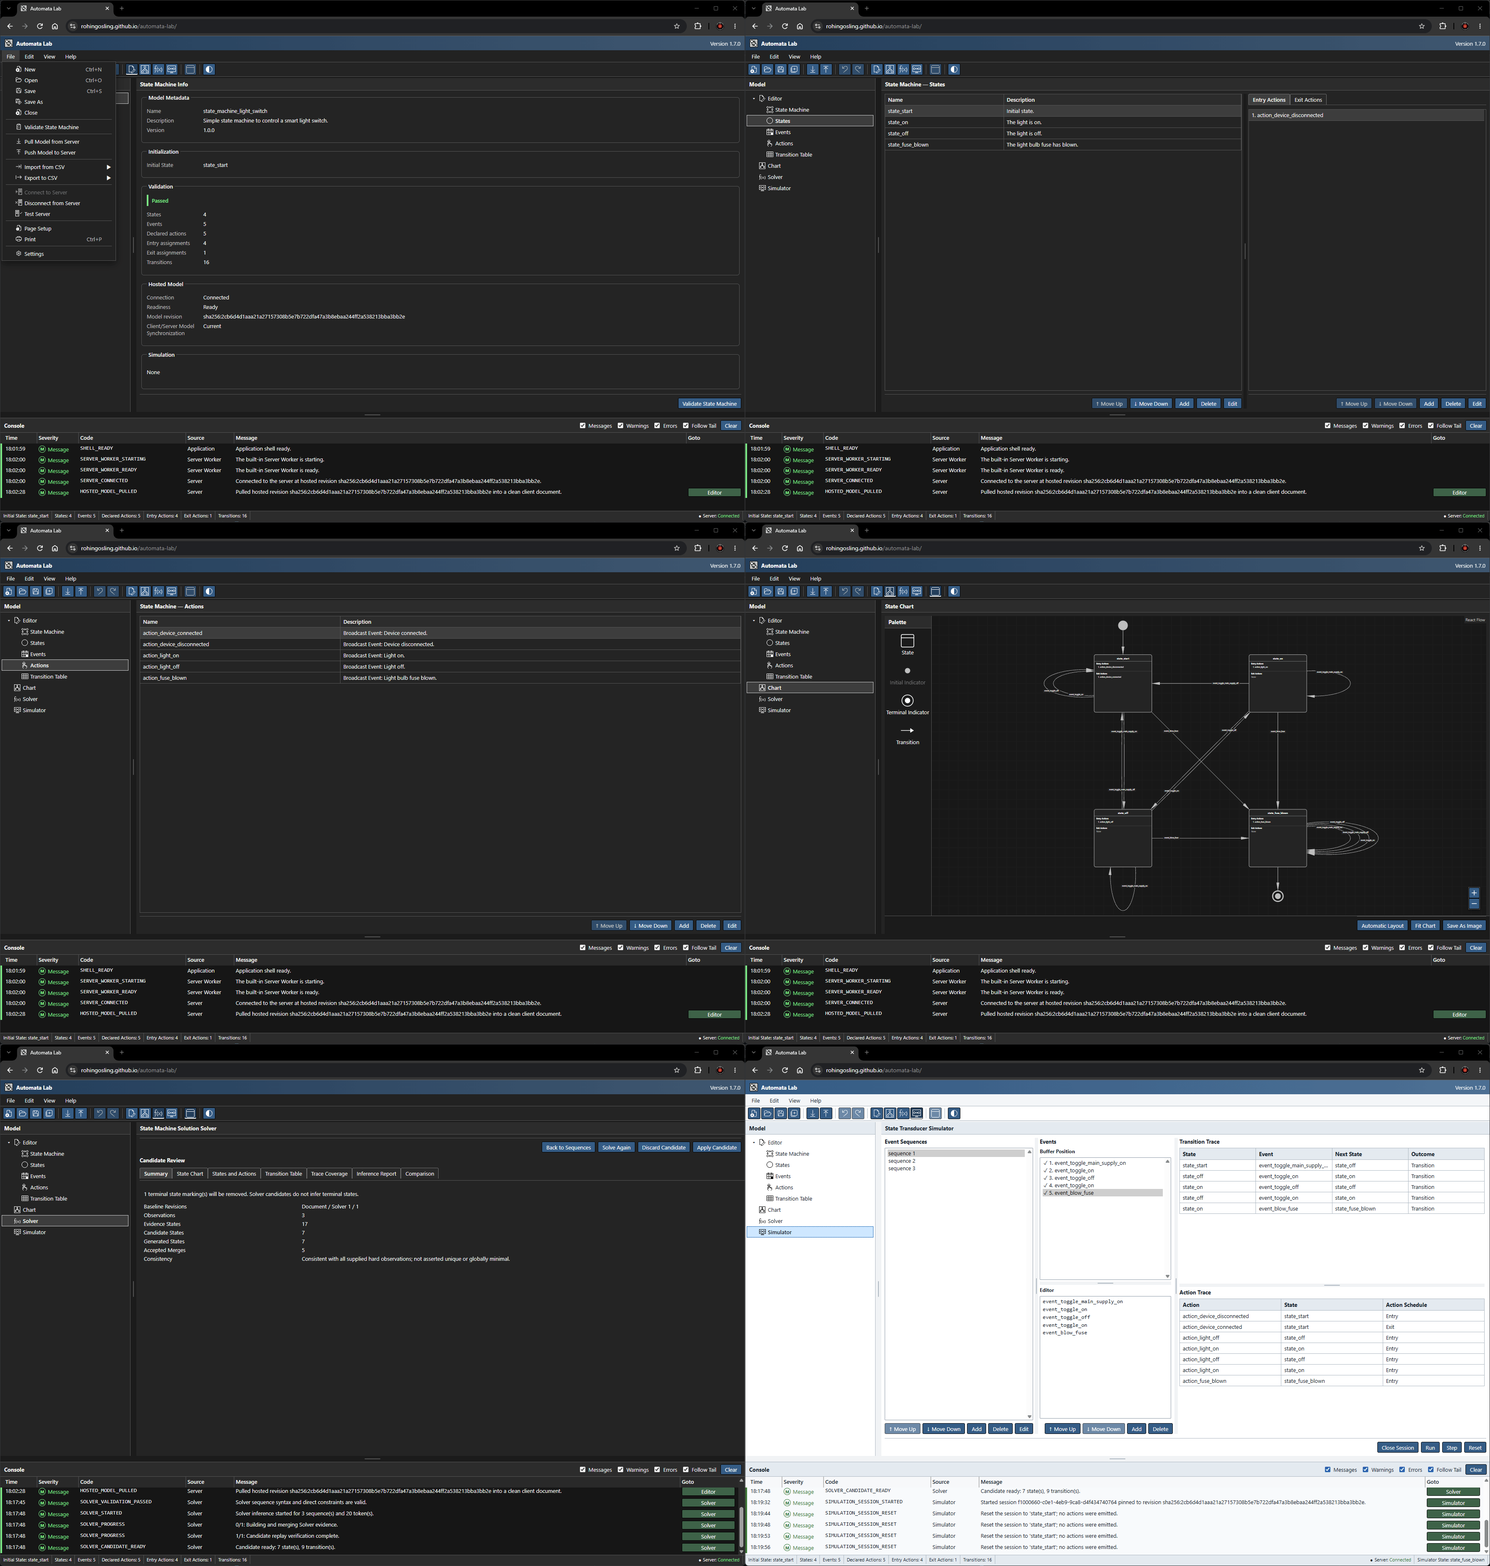
Animated tour of the Automata Lab application

An experimental sandbox for deterministic Moore-machine state transducers.
Infer, author, visualize, host, and simulate state-transducer models directly in the browser.

💻 Open Automata Lab   ▪  📄 Documentation

📚 Contents

🔎 Overview

Automata Lab provides four connected workspaces for creating and investigating deterministic Moore-machine-inspired state transducers. Automata Lab may be used as a sandbox within which to design, test and experiment with various types of state machine and state transducers.

WorkspacePurpose
EditorAuthors the model through structured forms, lists, action assignments, and a transition table.
ChartDisplays and edits the same model as a UML-like graph.
SolverInfers a reviewable candidate from partial observations of states, events, and actions.
SimulatorProvides a means to emulate the server and query the state transducer.

The application builds as a static React site for GitHub Pages. A dedicated browser Web Worker emulates the state-machine server, while a separate terminable worker performs inference. The result retains a clear client/server boundary without requiring installation or a remote service. The combined application and documentation are published at Automata Lab.

🚀 Quick Start

Hosted Web Application

Open the hosted Automata Lab application. Its integrated documentation includes the complete User and Developer Guides.

Run Locally

Install Git, Node.js, and npm, then run these commands in PowerShell (the same commands work in most shells):

git clone https://github.com/rohingosling/automata-lab.git
cd automata-lab/automata-web
npm ci
npm run documentation:ci
npm run dev

The development command verifies icons and the file schema, builds the Help documentation, and starts both local servers. Open the URL printed by Vite, normally http://127.0.0.1:5173/automata-lab/. Keep the terminal open; Ctrl+C stops both servers. The application and Help preview require free ports 5173 and 5174. See Development Setup for port overrides and production preview instructions.

Create Your First Model

  1. Select New on the toolbar, or press Ctrl+N, to create an in-memory model.
  2. In Editor, add at least one state, choose the initial state, then add any events and reusable actions you need.
  3. On the selected state’s Entry Actions and Exit Actions tabs, assign outputs in the order they should be reported.
  4. Build the partial deterministic transition function in Transition Table, or create the same transitions visually in Chart.
  5. Open State Machine and select Validate State Machine. Follow any diagnostics shown there and in the Console.
  6. Use Chart → Automatic Layout to inspect the model, or enter partial observations in Solver to infer a reviewable candidate.
  7. Select Save As whenever you want to preserve the portable JSON project. If no states or initial state have been defined yet, Automata Lab lists those requirements in a warning and can still save after confirmation; hosting and simulation still require a complete valid model.

Nothing is uploaded by merely opening or editing a model. Until you explicitly save, the authoring document remains in the browser page’s volatile memory.

📊 State Machine (State Transducer) Model

Automata Lab implements an extended Moore machine. Its deliberate extension is to define two state-only output functions, one for entry-action output and one for exit-action output, in place of the standard Moore machine’s single output function.

For strict Moore-machine operation, assign only entry actions and no exit actions. With only entry actions assigned and no exit actions assigned, the Automata Lab model is then mathematically equivalent to a Moore machine.

Standard Moore-Machine State-Transducer Definition

A Moore machine is defined as the six-tuple:

M=(S,s0,Σ,Λ,T,G),M = \left(S, s_0, \Sigma, \Lambda, T, G\right),

where SS is a finite set of states, s0∈Ss_0 \in S is the initial state, Σ\Sigma is the input alphabet, Λ\Lambda is the output alphabet, T:S×Σ→ST : S \times \Sigma \to S is the transition function, and G:S→ΛG : S \to \Lambda is the state-only output function.

Automata Lab’s Moore-Machine Inspired State-Transducer Definition

Automata Lab uses the corresponding seven-tuple, replacing the standard Moore machine output function GG with GentryG_{\mathrm{entry}} and GexitG_{\mathrm{exit}}.

MAL=(S,s0,Σ,Λ,T,Gentry,Gexit),M_{\mathrm{AL}} = \left(S, s_0, \Sigma, \Lambda, T, G_{\mathrm{entry}}, G_{\mathrm{exit}}\right),

with a partial deterministic transition function and two state-only output-word functions:

T:S×Σ⇀S,Gentry:S→Λ∗,Gexit:S→Λ∗.T : S \times \Sigma \rightharpoonup S, \qquad G_{\mathrm{entry}} : S \to \Lambda^*, \qquad G_{\mathrm{exit}} : S \to \Lambda^*.

Here, Λ∗\Lambda^* is the set of finite words over the action alphabet, including the empty word ε\varepsilon. Consequently, output order and repeated action symbols are part of the model.


States

A finite, non-empty set of states. It contains one or more states because a finite-state transducer, including a Moore machine, has an initial state.

S={s1,s2,…,sn},1≤n<∞.S = \{s_1, s_2, \ldots, s_n\}, \qquad 1 \le n < \infty.

Initial State

s0∈S.s_0 \in S.

Events

A list of zero or more events.

Σ={σ1,σ2,…,σm},0≤m<∞.\Sigma = \{\sigma_1, \sigma_2, \ldots, \sigma_m\}, \qquad 0 \le m < \infty.

Actions

A list of zero or more reusable actions. The entry- and exit-output functions associate ordered action words with states.

Λ={λ1,λ2,…,λk},0≤k<∞.\Lambda = \{\lambda_1, \lambda_2, \ldots, \lambda_k\}, \qquad 0 \le k < \infty.

Transition Function (Transition Table)

A partial deterministic transition function, implemented in Automata Lab as a transition table. Each state/event pair has at most one destination. An undefined pair leaves the current state unchanged and produces a warning.

T:S×Σ⇀S.T : S \times \Sigma \rightharpoonup S.

The standard Moore definition uses the total form T:S×Σ→ST : S \times \Sigma \to S; Automata Lab deliberately permits a partial function for experimental models.


Output Function(s)

An output function to map states to entry actions, and an output function to map states to exit actions.

Gentry:S→Λ∗.G_{\mathrm{entry}} : S \to \Lambda^*. Gexit:S→Λ∗.G_{\mathrm{exit}} : S \to \Lambda^*.

For a standard Moore output function G:S→ΛG : S \to \Lambda, the equivalent Automata Lab functions are

Gentry(s)=⟨G(s)⟩,Gexit(s)=ε.G_{\mathrm{entry}}(s) = \langle G(s) \rangle, \qquad G_{\mathrm{exit}}(s) = \varepsilon.

Operation

When an event causes a transition from ss to s′=T(s,σ)s' = T(s, \sigma), the runtime reports the output word

Gexit(s)⋅Gentry(s′),G_{\mathrm{exit}}(s) \mathbin{\cdot} G_{\mathrm{entry}}(s'),

where ⋅\cdot denotes concatenation. Repeated action assignments remain meaningful and retain their order. A self-transition reports the state’s exit actions and then its entry actions because the machine exits and re-enters that same state.

An unknown event or a defined event without a transition produces a warning and leaves the state unchanged. During Run, later buffered events continue.

Reset returns a session to its initial state, clears its traces, and emits nothing. The next Run or Step emits the initial entry actions once. A session whose event buffer becomes empty remains Running at its current state so another sequence can continue it.

🧠 Partial-Observation Solver

The Solver infers a compact deterministic candidate consistent with every supplied observation. It uses constrained state merging in the evidence-driven/red-blue family. Because finite partial evidence rarely identifies one unique machine, the Solver presents its result as a candidate with provenance and assumptions rather than as a uniquely correct or globally minimal answer.

Solver text uses explicit token prefixes:

  • event_... identifies an observed event;
  • state_... identifies an observed state;
  • action_... identifies an observed action.

For easier entry and pasted notes, Event, State, and Action classifiers may also use title or uppercase spelling and _, -, or whitespace separators; compact forms such as EventOpen are accepted. Automata Lab canonicalizes the classifier to event_, state_, or action_ before inference while preserving the name suffix.

Each saved sequence declares one starting context: initial, continuation, or infer.

Events delimit transition steps. State and action tokens before the first event describe the starting state. State and action tokens between two events describe the destination reached by the preceding event. State and action tokens may be interleaved, while action order remains significant. The actions within an interval form that destination state’s complete ordered entry-action list; an interval without actions describes an empty list.

Every observation is a hard constraint. Conflicting explicit states, incompatible complete action lists, or incompatible deterministic destinations produce explained diagnostics and no candidate. The Solver merges compatible evidence and invents hidden states when necessary, while reporting every weakly supported or invented structure. Unobserved state/event pairs remain undefined, and Solver-generated exit-action lists remain empty.

A successful candidate remains immutable during review. Candidate Review includes a summary, read-only Chart, state/action tables, transition provenance, trace coverage, inference report, and comparison with the current model. A separately confirmed Apply command replaces the local model as one undoable operation. Apply does not save or push the document.

📝 Authoring and File Format

Solver, Editor, and Chart operate on one in-memory authoring document. Editor provides the complete data-centric and keyboard-accessible workflow. Chart has equal semantic write authority and dispatches the same model commands. Moving a state preserves the current Chart pan and zoom after release. PNG/JPG Chart export defaults to a configurable 1,000-megapixel pre-allocation ceiling, adjustable from 1 through 1,000 under Application Settings → Chart → Image Export.

Incomplete drafts remain editable in memory. A structurally sound project can be saved with zero states and/or no initial state after an explicit warning; reopening it shows the same missing requirements in a dialog and in the Console. Malformed structure, invalid metadata, duplicates, dangling references, and other integrity errors still block loading or saving. Push, simulation, and Solver Apply become available only when complete semantic validation passes. Renames update every reference atomically. Deletions present their complete impact and remove dependent references as one undoable change.

The File → Import from CSV and Export to CSV submenus include one-record Model Metadata transfer using name,description,version,initial_state. Transition Table imports identify undeclared state and event names in separate selectable, read-only text areas for easy copying, while every import failure and warning is also recorded in the Console.

Automata Lab uses strict UTF-8 JSON with this top-level identity and structure:

{
  "file_id": "automata-lab-state-machine",
  "file_version": "1.4.0",
  "settings": {},
  "state_machine": {},
  "chart": {},
  "solver": {},
  "simulator": {}
}

Readers accept files 1.0.0 through 1.4.0; canonical Save always writes 1.4.0 with explicit terminal_state booleans. Older configured terminal relations migrate to true flags. Modern flags govern notation repair. The current terminal-state example and the legacy migration example load to the same model. States CSV exports name,description,terminal_state; an absent flag column preserves existing flags and defaults new states false.

Terminal State in Editor/Chart state dialogs synchronizes the flag and notation atomically. Application Settings → Simulator → Model Parameters → Enable Terminal States defaults off and is captured at Start Session or Reset. When enabled, terminal entry completes entry actions, preserves traces and stops before the next event. Initial terminal entry consumes zero events on first Run/Step. Run/Step then require Reset or a new session. Solver candidates default all flags false and disclose their removal before Apply; Undo restores them. Printing includes a Yes/No terminal column, and image exports retain notation regardless of execution policy. The built-in Worker uses strict protocol automata-lab-server/2.

The nested members are validated strictly. Automata Lab rejects unknown properties, duplicate JSON members, dangling references, duplicate transition keys, unsupported versions, and exceeded limits before replacing the current document. Chart settings and placement are portable document data.

Save Backup defaults off. When it is enabled, a file adapter with the required capability may replace a sibling .json.bak with the previous file content before saving. A browser that cannot create that sibling silently saves the current JSON once and records FILE_BACKUP_SKIPPED in the Console; it does not open a folder picker, download a second .bak file, or show a backup-warning dialog. Save uses its associated handle where available, and Save As uses one native save-file picker or one download fallback.

🖥️ Built-In Server

The browser-local server owns one immutable hosted document revision and any active isolated simulation sessions. The client owns the authoring document. The two communicate only through a validated, bounded, versioned gateway.

The File menu provides Connect, Disconnect, Test Server, Pull, and Push commands. Push validates and conditionally replaces the hosted head revision. Pull retrieves that revision while protecting dirty local work. Ordinary editing and Solver Apply affect only the client document.

Each simulation session pins the revision active when the session is created. A later Push does not mutate the existing session; the application marks it stale while allowing it to continue or Reset against its pinned snapshot. Closing it and creating a new session captures the current hosted revision.

The built-in transport remains local to the browser page. Its HTTP-shaped operations keep the client gateway compatible with an external HTTP transport adapter.

OperationHTTP semantic
HandshakeCapability and protocol negotiation.
Liveness/readinessGET /api/v1/health/live and GET /api/v1/health/ready.
Pull modelGET /api/v1/model.
Conditional PushPUT /api/v1/model.
Start sessionPOST /api/v1/sessions.
Run or StepPOST /api/v1/sessions/{id}/run or /step.
Reset sessionPOST /api/v1/sessions/{id}/reset.
Close sessionDELETE /api/v1/sessions/{id}.

📖 Documentation

The live documentation home, task-oriented User Guide, and implementation-focused Developer Guide build into the same GitHub Pages artifact as the application and require no hosted documentation service at runtime. Their public sources live in documentation/.

🛠️ Development

Prerequisites

  • Node.js 24.15.0
  • npm 11.12.1
  • Playwright-supported operating-system libraries for Chromium, Firefox, and WebKit browser testing

The committed repository contains every asset needed to build and test the application. Access to a complete external Fluent icon collection is required only when adding or refreshing the curated Fluent subset.

Commands

The application package is in automata-web/. Run npm commands from that directory.

CommandPurpose
npm ciInstalls the exact locked dependency graph.
npm run devStarts the Vite development server.
npm run icons:checkVerifies the exact curated Fluent icon set and its hashes.
npm run icons:import -- --source <directory>Imports the selected Fluent icons from an external master collection.
npm run audit:runtimeVerifies the lockfile-derived production closure and committed complete license inventory without network access.
npm run audit:runtime:writeMechanically regenerates the runtime notice after an intentional reviewed dependency change.
npm run audit:advisories:offlineQueries only npm advisory data already present in the local cache; it is not a live advisory check.
npm run typecheckRuns strict TypeScript checks.
npm run lintRuns ESLint.
npm run test:unitRuns all Vitest suites.
npm run test:modelRuns Phase 1 file, validation, command, runtime, Solver-observation, hashing, and property tests.
npm run test:solverRuns Solver-focused Vitest suites.
npm run test:shellRuns shell-focused Vitest suites.
npm run test:browser:installNon-interactively installs the Chromium, Firefox, and WebKit revisions pinned by Playwright 1.62.1.
npm run test:browserRuns Playwright browser tests.
npm run test:accessibilityRuns the dedicated accessibility browser suite.
npm run buildBuilds and audits the application artifact.
npm run build:pagesBuilds and verifies the combined application and documentation Pages artifact.
npm run test:artifactAudits an existing production artifact.
npm run previewServes the audited production build locally.
npm run verifyRuns application, documentation, combined-artifact, and browser verification.

After npm ci on a clean host, run npm run test:browser:install before the browser suite. This invokes the package-local Playwright 1.62.1 CLI, not a global or newly resolved CLI, so its Chromium, Firefox, and WebKit revisions remain synchronized with package-lock.json. The command is non-interactive; it requires network access only when the matching browser cache is absent.

From the repository root, build.bat performs the locked dependency install, the pinned Playwright browser install, and the complete verification/build workflow while preserving the underlying exit status.

The committed package.json and package-lock.json pin every dependency version. The production build targets the /automata-lab/ GitHub Pages subpath.

The Fluent icon selection is declared in assets/images/icons/fluent-icons.json. Imported project copies live in assets/images/icons/fluent/; Vite serves them during development and emits only that curated subset into the production artifact. The external master collection is never required by CI, promotion, deployment, or application runtime.

📄 License

ECA Rule Engine Lab

GitHub

Java JavaFX Helidon GraalVM TypeScript React

Domain independent, stateless ECA Rule Engine reference implementation, Version 2.1.0.
Companion implementation for the Stateless ECA Rule Engine technical note.

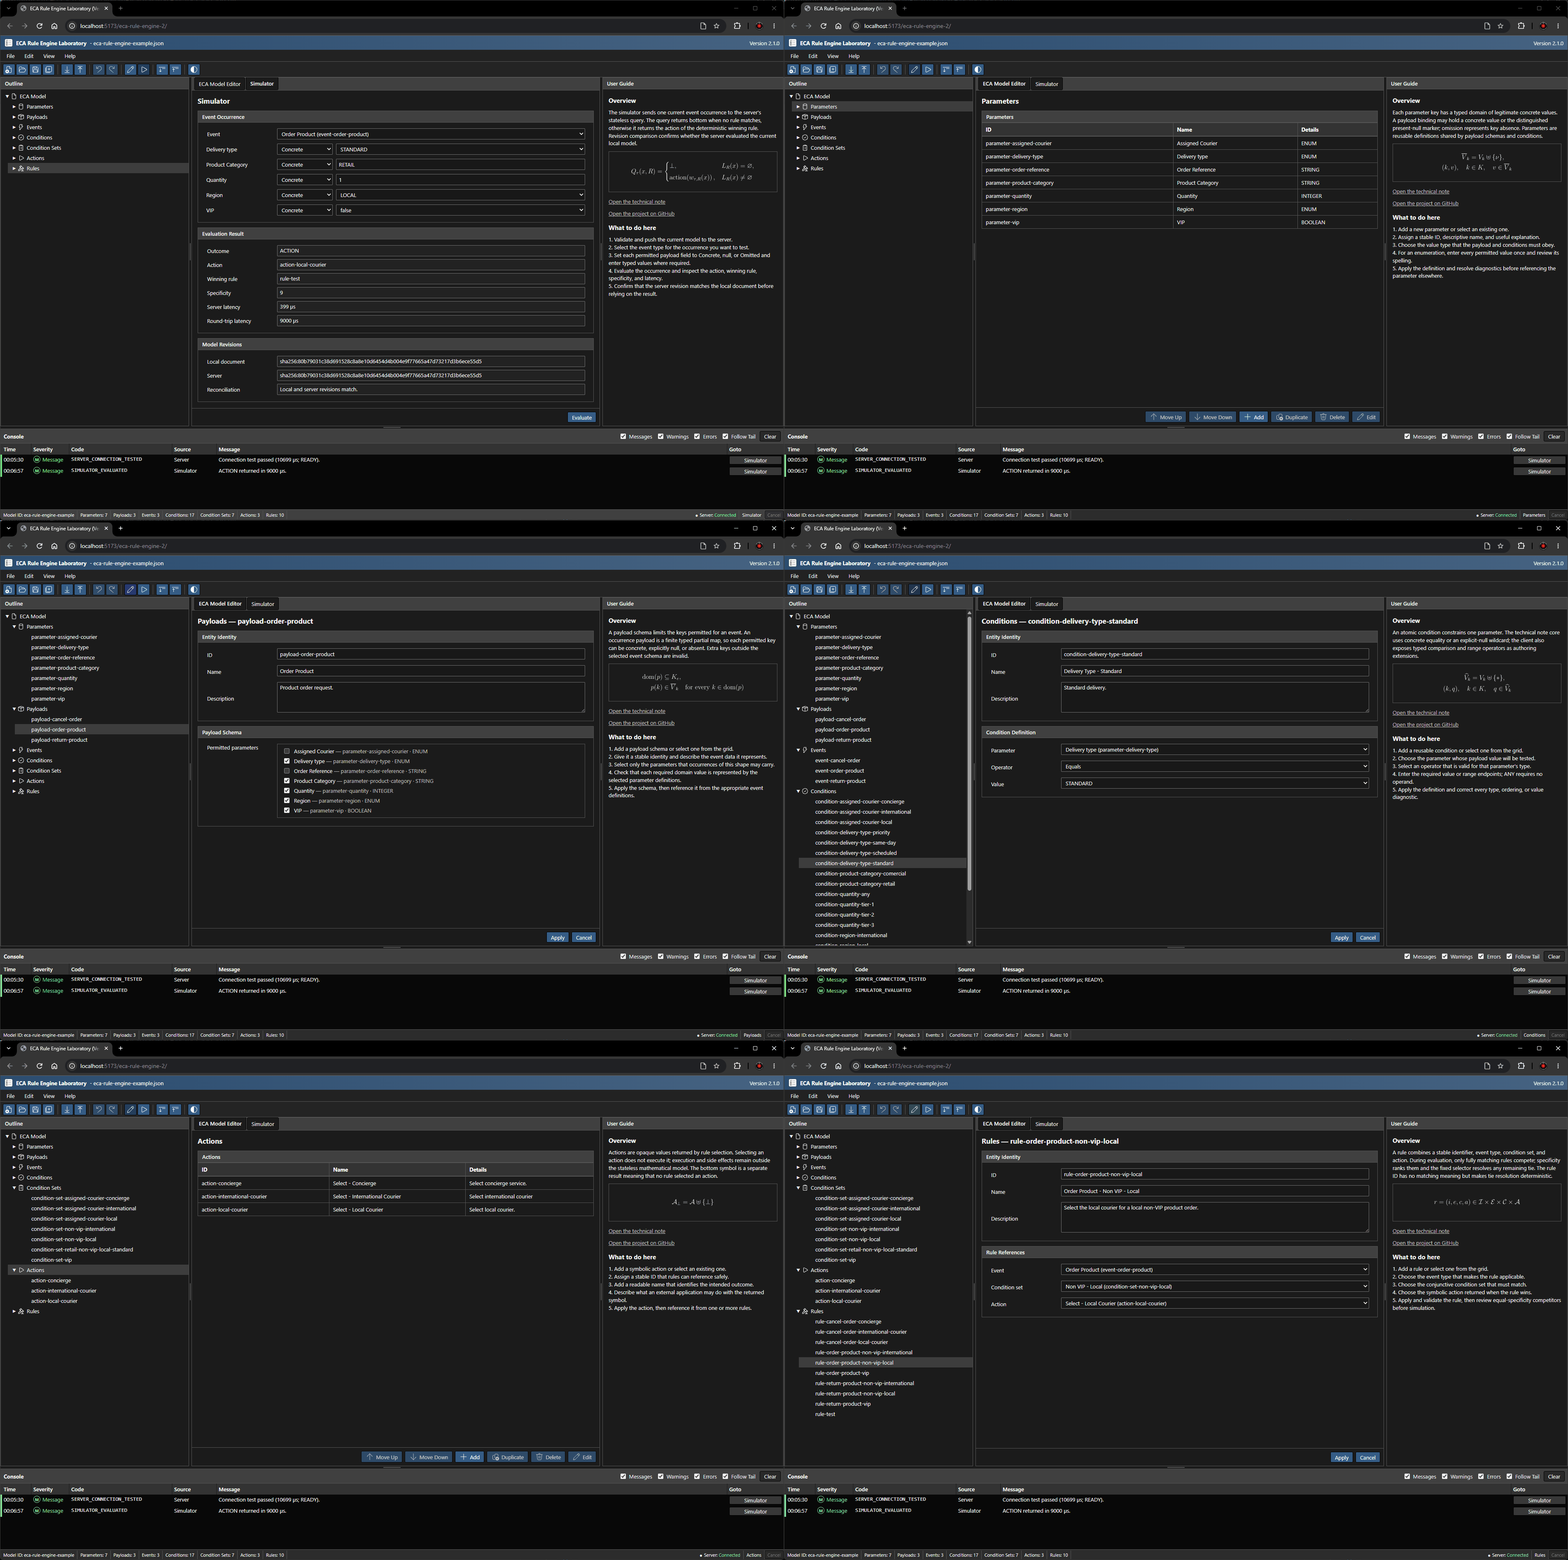
Animated walkthrough of ECA Rule Engine Laboratory

🌐 Try ECA Rule Engine Laboratory in your browser

The web demo of ECA Rule Engine Laboratory will start with an emulated ECA Rule Engine server already running in the background, with the eca-rule-engine-example.json example model pre-loaded.
Equivalent to starting the real server with, eca-server.exe start --model eca-rule-engine-example.json.

In the web demo of ECA Rule Engine Laboratory, the quickest way to load the example model is to pull it directly from the demo server with File -> Pull Model from Server.

📚 Contents

🔎 Overview

This project implements a domain-independent, stateless, ECA (Event Condition Action) rule engine reference solution that accompanies the Stateless ECA Rule Engine technical note.

The solution consists of an ECA rule engine server, a desktop client, and a web version of the client with its own browser-local built-in server. ECA Rule Engine Laboratory can be used as both a standalone ECA model editor and a simulator for testing interaction with an ECA rule engine server.

🌐 Try the Demo Web Client

To quickly try out the client application, open ECA Rule Engine Laboratory in your browser to explore the model editor and validation workflow without installing Java or downloading the Windows executables.

The web demo of ECA Rule Engine Laboratory will start automatically connected to an emulated version of the ECA Rule Engine server running in the background, with the eca-rule-engine-example.json example model pre-loaded. Equivalent to executing the production server from a local Windows terminal with eca-server.exe start --model eca-rule-engine-example.json.

The web demo of ECA Rule Engine Laboratory looks and works exactly like the production desktop version, except for additionally supporting the emulated demo server. While you can also use the web demo to connect to a real remote server, the point of the web demo is to offer a quick and easy way to try out the application without the hassle of downloading eca-server.exe, running it, and then using File -> Settings in the client to connect to it. If you’re going to run eca-server.exe, then it makes more sense to connect to it with the production client eca-client.exe.
…See instructions for that below.

Example workflow

  1. open ECA Rule Engine Laboratory in your browser, and wait for the built-in server’s Ready entry in the structured Console.

  2. Choose File > Pull Model from Server, then open the Simulator tab.

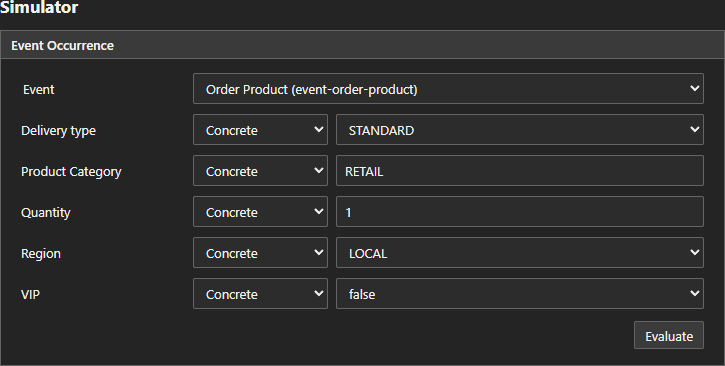
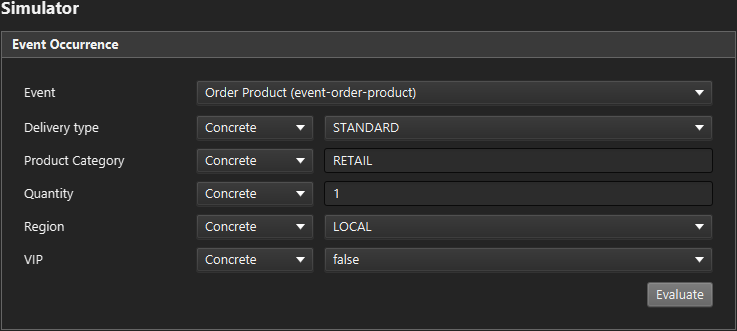
  3. Select event-order-product. Set every displayed payload state to Concrete, using STANDARD delivery, RETAIL category, quantity 1, LOCAL region, and VIP false.

    Web demo occurrence configured for evaluation
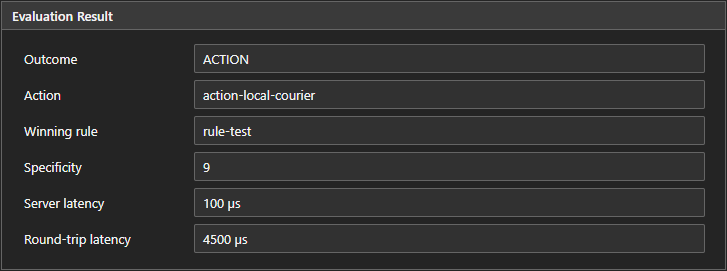
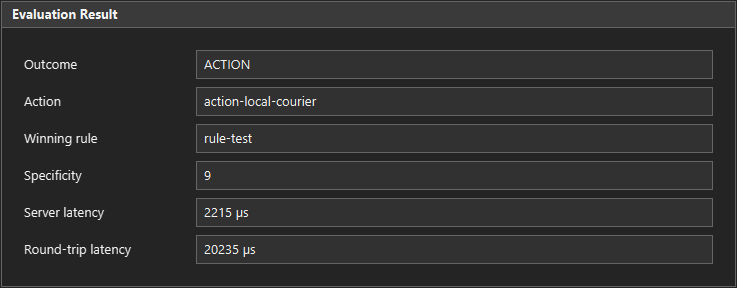
  4. Press the Evaluate button to obtain the action-local-courier ACTION result.

    Web demo action result after evaluation

🚀 Windows Quick Start

The release consists of two Windows 11 x64 executables. Java, GraalVM, Maven, and a source checkout are not required to run them.

  1. Install or update Microsoft’s signed Visual C++ v14 x64 Redistributable. Approve the one-time Windows elevation prompt and restart only if the Microsoft installer requests it.

  2. Download both release files into a folder: eca-server.exe and eca-client.exe.

  3. Start the server, then the client:

    .\eca-server.exe
    

    Leave that terminal open. Launch eca-client.exe directly by double-clicking it, or run it from a second terminal:

    .\eca-client.exe
    

The Redistributable is required by both executables and is installed once for the machine. The ECA executables remain unsigned academic artifacts, so this Quick Start applies only where Windows security policy permits unsigned local applications. Windows may show an unrecognized-publisher warning; Smart App Control or an organization-managed Application Control policy can instead block them outright. This is an accepted limitation. Do not weaken the machine’s security policy to run ECA.

GitHub automatically presents source code ZIP and tar archives for each release. The only project-supplied binary assets are eca-server.exe and eca-client.exe; their SHA-256 hashes and tag-build provenance appear in the release notes rather than in a third downloadable checksum file.

🧩 Rule Model

The ECA rule engine server implements the following ECA rule model.

Each rule associates:

  1. one event;
  2. one conjunctive condition set; and
  3. one action.

Reusable conditions own a parameter, an operator, and any required typed operands. Condition sets select those predefined conditions without redefining their values.

Supported condition operators are:

  • equality and inequality;
  • integer greater-than and less-than comparisons;
  • inclusive and exclusive integer ranges; and
  • ANY, an explicit wildcard matching concrete, present-null, and absent payload values.

Every matching non-ANY predicate contributes two specificity points. Every selected ANY predicate contributes one point, and an omitted condition contributes zero. The matching rule with greatest specificity wins; equal scores are resolved by the lexicographically smallest stable rule ID.

🖥️ ECA Rule Engine Laboratory - Desktop Client

ECA Rule Engine Laboratory is an SDI (Single Document Interface) JavaFX desktop client with the following features.

  • ECA model editor.
  • ECA model validation.
  • ECA model simulator.
  • Loading and saving ECA models to disk in JSON format.
  • Ability to pull hosted models from the server, or push edited models to the server in real time.
  • A context-aware User Guide panel that surfaces sections of the Stateless ECA Rule Engine technical note relevant to the component being edited or studied in the editor.
  • A structured, filterable Console with severity, source, code, message, and context columns.

The Simulator derives typed payload controls from the selected event. Every permitted payload property can be sent as a concrete value, explicit JSON null, or omitted property. Evaluation runs asynchronously and reports the outcome, selected action, winning rule, specificity, server and round-trip latency, and model revision. The client also shows whether the server revision matches the current local document.

Play with the example - eca-rule-engine-example.json

  1. Start the server in PowerShell.

    For this step we are presuming you have a copy of the repo on your machine including the examples folder.

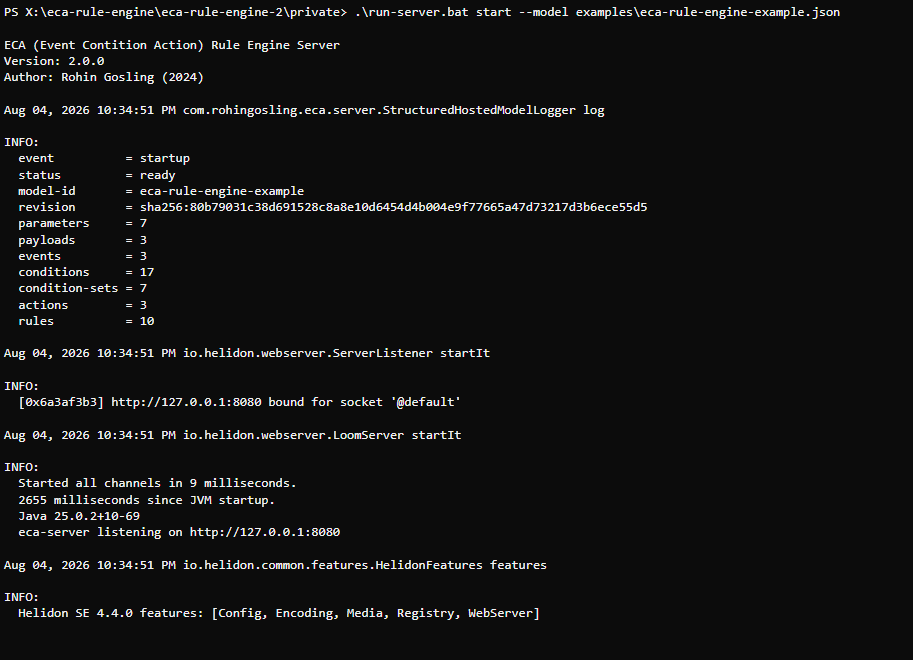
    run-server.bat
    

    Started without arguments, run-server.bat hosts the bundled example model, examples\eca-rule-engine-example.json. To host a different model, pass the command and its arguments through explicitly.

    run-server.bat start --model <model-name.json>
    

    Server started with the example model

  2. Open a second PowerShell terminal, and start the client (ECA Rule Engine Laboratory) with run-client.bat. Keep the server running in the first terminal.

  3. There are two ways to load a model into ECA Rule Engine Laboratory. You can load the model from disk, or you can pull the model from the running server.

    • Load model from disk

      From the File → Open menu in ECA Rule Engine Laboratory, load the ECA example model, examples\eca-rule-engine-example.json.

      Note:
      This will only work if you load the same model the server is hosting, examples\eca-rule-engine-example.json in the case of this example.

    • Pull the model being hosted by the server

      Pull the model being hosted by the server into ECA Rule Engine Laboratory with File → Pull Model from Server.

      Note:
      This will only work if the server is hosting a model, which it is by default, and which it also is whenever it was started with an explicit --model <file name> argument.

  4. To test a query to the server, Select the Simulator tab in ECA Rule Engine Laboratory, and setup the query as depicted in the figure below.

    Desktop simulator example query configuration Desktop simulator example query details
  5. Press the Evaluate button to send the query to the server.

⚙️ ECA Rule Engine Server

The ECA Rule Engine Server uses Helidon, and can host at most one immutable model snapshot to expose a versioned JSON HTTP API for:

  • Liveness and readiness.
  • Model installation and retrieval.
  • Occurrence evaluation.
  • Authenticated graceful shutdown.

🔌 HTTP API

The server listens on http://127.0.0.1:8080 by default. Its versioned JSON endpoints are:

MethodPathPurpose
GET/api/v1/health/liveReport process liveness.
GET/api/v1/health/readyReport evaluation readiness and the active model revision.
GET/api/v1/modelDownload the active authoring model.
PUT/api/v1/modelValidate and atomically replace the active model.
POST/api/v1/evaluationsEvaluate one event occurrence.
POST/api/v1/management/stopRequest graceful shutdown.

Loopback use permits model reads and evaluations without a bearer token. Model replacement and graceful shutdown are protected; the server creates or reads the token file in its data directory. Use eca-server.exe --help and eca-server.exe start --help for the complete host, port, token-file, data-directory, request-limit, and startup-model options.

Optional Browser Access

Cross-origin browser access is disabled by default. To let the experimental real-server target in the GitHub Pages application call the loopback server, allow that one exact origin and provide a high-entropy bearer token for Push. The following PowerShell workflow creates a 256-bit token in process memory, copies it to the clipboard without printing it, and starts the server without putting the token on the command line:

$serverTokenBytes = [ byte [] ]::new ( 32 )
[ Security.Cryptography.RandomNumberGenerator ]::Fill ( $serverTokenBytes )
$env:ECA_SERVER_TOKEN = [ Convert ]::ToBase64String ( $serverTokenBytes )
$env:ECA_SERVER_TOKEN | Set-Clipboard
.\eca-server.exe start --model examples\eca-rule-engine-example.json --allowed-origin https://rohingosling.github.io

Paste the clipboard value into Settings > Server > Bearer token in the same browser page. The web client retains it only in page memory. Clear the clipboard after pasting, and clear ECA_SERVER_TOKEN after stopping the server. The browser will require an explicit Local Network Access permission grant. A denial or enterprise policy block is reported as blocked-or-unreachable and never disables the built-in demo server.

Repeat --allowed-origin <origin> only for another exact trusted HTTP(S) origin. Wildcards, Origin: null, URLs with paths, and arbitrary reflected origins are rejected. This option does not change the loopback bind, request limits, protected-operation authentication, or the requirement for trusted HTTPS when a server is exposed remotely.

🛠️ Build and Run

Prerequisites

Running the two release executables requires Windows 11 x64 and the latest supported Microsoft Visual C++ v14 x64 Redistributable described in the Windows Quick Start.

Building from source additionally requires:

  • JDK 25 for the complete Maven reactor and server work.
  • JDK 17 or later for the JavaFX client-only workflow.
  • Oracle GraalVM 25.0.4 for the native server, selected with SERVER_GRAALVM_HOME.
  • Gluon GraalVM 22.1.0.1 with Java 17.0.3 for the native client, selected with CLIENT_GRAALVM_HOME.
  • Visual Studio 2022 with the Desktop development with C++ workload and an x64 Windows SDK for native builds.

The Maven Wrapper is included; a separate Maven installation is not required.

JVM Verification

From the project root:

build.bat

This runs the complete clean Maven verification reactor.

JavaFX Client — ECA Rule Engine Laboratory

run-client.bat

This builds the required Java 17-compatible modules and launches the client on the JVM.

Native Executables

build-native.bat

The server build enables package-scoped exact reachability checking and both builds forbid fallback images. Checked-in reflection, resource, JNI, icon, and Windows version resources are covered by the JVM verification suite.

The native outputs are:

  • eca-server\target\eca-server.exe
  • eca-client\target\gluonfx\x86_64-windows\eca-client.exe

After building, run the independent native artifact and performance gates:

verify-native.bat

On a Windows 11 development host with Windows Sandbox enabled, run the disposable clean-machine gate with:

.\.github\scripts\native\verify-clean-windows-sandbox.ps1

If that Sandbox enforces a policy that rejects unsigned applications, retain the failure as environment evidence and do not disable the policy. Prepare the same hash-bound acceptance bundle for a separate clean VM whose existing policy permits unsigned local applications with:

.\.github\scripts\native\verify-clean-windows-sandbox.ps1 -PrepareOnly

Copy the reported bundle directory into the VM and run the command printed by the script. The VM run remains open after completion so its exported evidence can be reviewed and copied back.

This verifies the following.

  • x64 PE identity
  • Version and icon resources
  • Windows and approved Microsoft Visual C++ runtime import allowlists
  • Centrally installed x64 runtime version, location, and Microsoft signatures
  • SHA-256 checksums
  • Isolated copy-one-file execution.
  • The rendered JavaFX smoke path
  • Server cold start
  • Checks for 10,000-rule performance target
  • Concurrent correctness
  • Model-replacement availability
  • Clean Windows 11 runtime installation and three-step launch acceptance

The verifier reports the measurements, checksums, and pass/fail status at completion.

Start the native server directly with:

.\eca-server.exe

To validate, persist, and host a model as part of the same foreground startup:

.\eca-server.exe start --model examples\eca-rule-engine-example.json

The server listens on 127.0.0.1:8080 by default.

📄 License

Released under the MIT License - Copyright © 2025 Rohin Gosling.

VJE (VErsatile JSON Editor)

GitHub

Under construction - VJE 2.0 is still in development

Version 2.0 (Pre-Alpha) – In development

C++ Qt Windows Linux

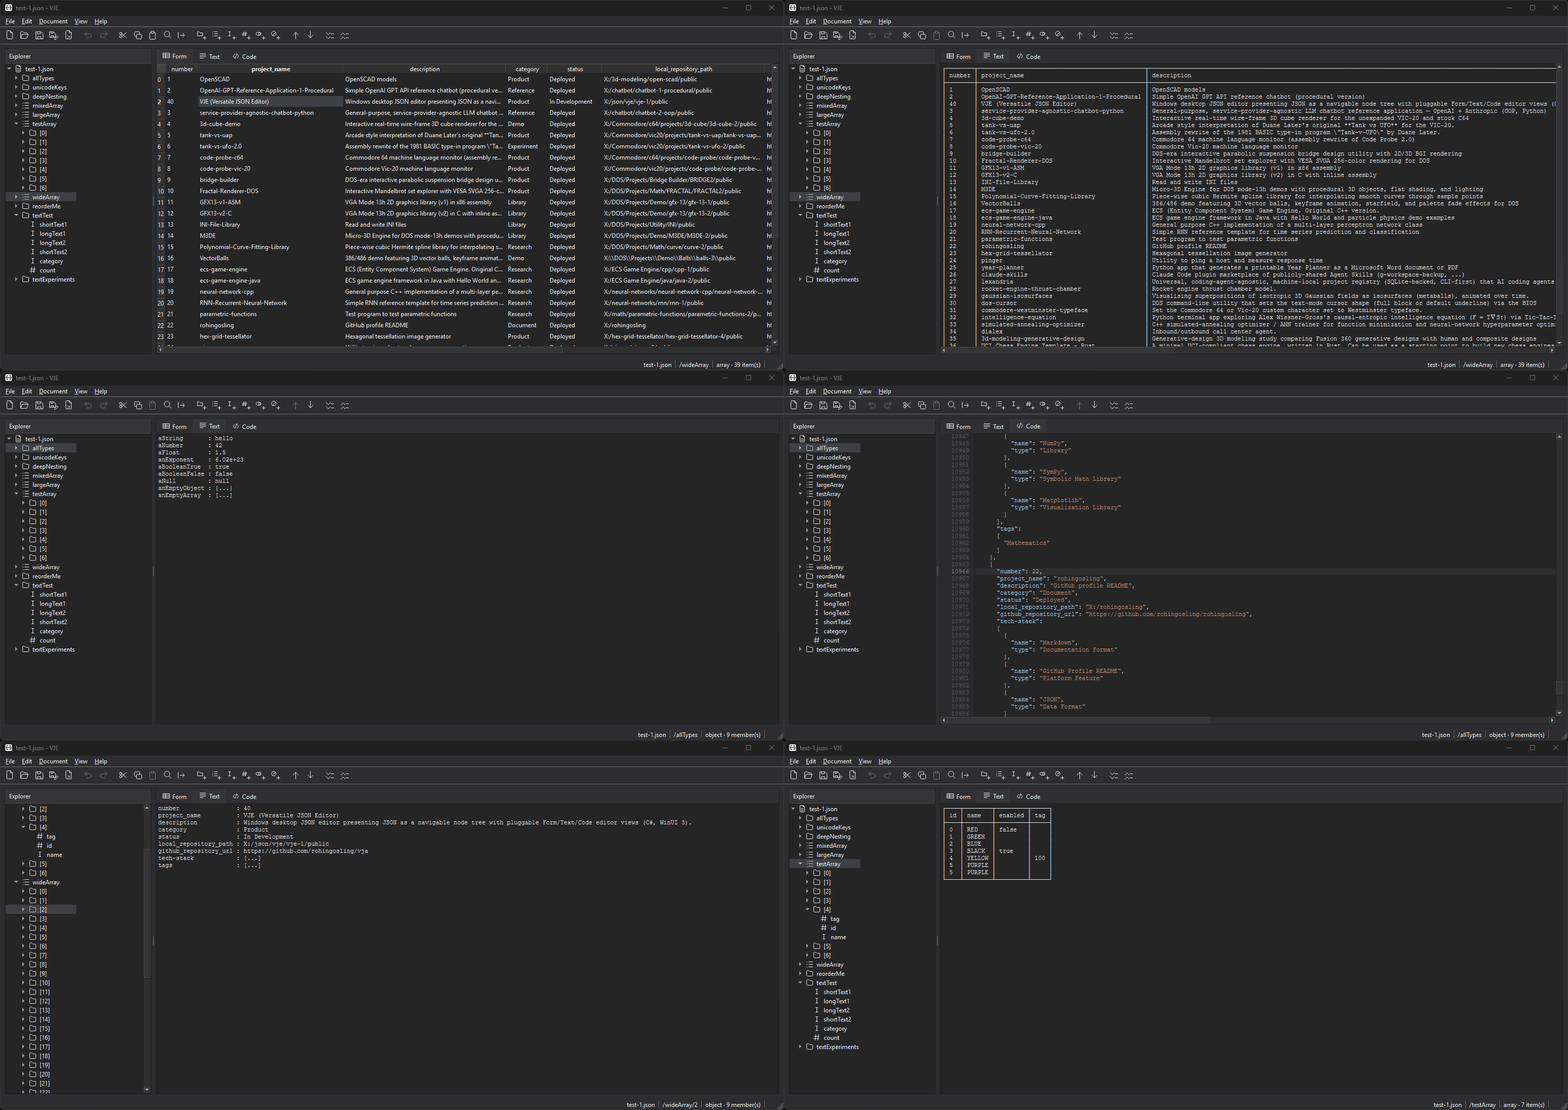
VJE showing a JSON document as a navigable tree beside a form-based editor

📑 Table of Contents


✨ What It Does

Many JSON editors hand you a wall of context-unaware data and leave the structure for you to hold in your head. VJE presents JSON as an outlined document, the way you actually think about it. VJE presents JSON to you in a way that feels like the application was built specifically for your data, rather than a generic data dump.

VJE is great for navigating and editing configuration files, and works really well as a pseudo database for storing and navigating hierarchically arranged information.

Features

  • Import, Export, and Conversion

    • Import from XML, YAML, and CSV.
    • Export to XML, YAML, and CSV.
    • Convert JSON objects to arrays.
    • Convert JSON arrays to objects.
    • Convert between JSON data types, string, number, boolean, and null.
  • Explorer tree

    • The tree view explorer surfaces JSON in the style of a document outline.
  • Form View

    • JSON objects are surfaced in the format of a master-detail form, offering a dedicated application-like user experience.
    • JSON arrays are surfaced as editable spreadsheet-like tables. Both homogenous and jagged arrays are supported with all the tools you need to manipulate, normalize, and convert between various array structures.
  • Text View

    • A read-only, format-configurable, text rendering of the data, making it super easy to copy and paste formatted text representations of JSON data into other documents.
    • Eight table styles (Academic, Compact, Columnar, Spreadsheet, Minimal, Markdown, CSV, TSV).
    • A Markdown list form, and an aligned key/value listing.
  • Code View

    • JSON code editor, for when you just need to see and edit the code.
    • Syntax-highlighted, with a line-number gutter, current-line marker, and block indent/outdent.
    • Tree navigation keeps working during an uncommitted edit, and an invalid buffer cannot be committed.
  • JSONPath Query View

    • Ask the whole document a question, and get back a list of results you can click.
    • Root, child by name, index, slice, wildcard, recursive descent, union, and filter expressions, the accepted grammar is stated exactly, and anything outside it is reported with its position rather than silently ignored.
    • Every result is a JSON Pointer: choose one and the tree selects and reveals that node, expanding a collapsed branch to get to it.
    • Open it from the View menu; close it, like any other tab, when you are done.
  • Intuitive, Context-Aware Editing

    • Add, rename, duplicate, delete, reorder, and convert between containers, from the menu bar, the toolbar, or a context menu.
    • Cut, copy, or paste of whole nodes and of individual table cells, inter-operating with external editors.
    • Whole rows and columns too: click a column header or a row index to select it, then cut, copy, paste or delete it. A copied column can be pasted anywhere, onto another column, into an array, or into an object, and what it becomes is decided by what it lands on.
  • Finding your way around

    • Goto takes a JSON Pointer (e.g. /projects/0/name) and jumps straight there.
    • Copy JSON Pointer puts the selected node’s path on the clipboard in exactly that form, so you can wander off, do other work, and paste your way back.
  • Files

    • Import and export CSV, YAML, and XML.
    • Multiple XML import interpretation algorithms to chose from.
  • Look and feel

    • Light, Dark, and System themes.
    • Two interface styles, Fluent and Classic, each with its own icon family, switchable without a restart.
  • Target OS

    • Windows
    • Linux
    • macOS (Coming soon)

Planned

Ideas for a later release. These are not part of 2.0. Nothing below is implemented, and none of it is scheduled yet.

  • Analysis
    • JSONPath query editor.
    • Mind map.
    • Histogram.

🚦 Project Status

  • VJE 2.0 is under active development and is not yet ready for general use.
  • VJE 1.x, along with their predecessor Treepad, have been depreciated.

🚀 Quickstart

There is no binary release yet, build from source (see Build below), then run the executable from the build tree.

Open a document with File ▸ Open, by dropping a file onto the window, or by passing a path on the command line:

Windows

```bat build\windows-release\src\vje_app\vje_app.exe path\to\document.json ```

Linux

```bash build/linux-release/src/vje_app/vje_app path/to/document.json ```

A sample document ships with the source at assets/sample-files/smoke-test-1.json, and it is the fastest way to see what VJE does. It opens on ordinary data, an application config, the eight planets as a table, twenty sensor readings, and then works down through the awkward cases: every JSON type, every string escape, unicode and emoji in both values and keys, number tokens that must survive a round trip unchanged, ragged and mixed-kind arrays, RFC 6901’s own JSON Pointer test keys, duplicate sibling keys, ten levels of nesting, and a 2,000-element array to open the tree on something worth navigating. Every section carries a _note saying what it is there to show. Nothing in it is loaded by the application, so it is safe to edit freely.


🔨 Build

Requires CMake 3.21+, Ninja, GCC 13 or later, and Qt 6, including the Qt SVG module, which is a hard dependency (the Fluent icon family is vector, and the test suite rasterizes it to check it against the artwork it was traced from). Both platforms build the same source tree with the same compiler family; there is no per-OS source split.

On Windows, GCC comes from MinGW-w64 and must match the Qt MinGW build you install. On Linux, GCC 13 comes from your distribution’s toolchain packages, and Qt 6 from either your package manager or aqtinstall.

Configure, build, and test through the presets in CMakePresets.json:

cmake --preset linux-release
cmake --build --preset linux-release
ctest --preset linux-release --output-on-failure

Substitute windows-debug, windows-release, or linux-debug as needed. Each preset builds into build/<preset-name>/, and the application lands at build/<preset-name>/src/vje_app/vje_app.

The build is warnings-as-errors on both platforms, and the test suite is 54 CTest suites covering the domain library headlessly and the widget layer offscreen. The GitHub Actions workflow runs the same presets across a Windows (MinGW GCC 13.1 / Qt 6.8.3) and Linux (GCC 13 / Qt 6.8.3) matrix on every push.

yaml-cpp is the only external dependency and is fetched automatically by CMake - nothing to install. YAML support can be turned off with -DVJE_ENABLE_YAML=OFF, and the tests with -DVJE_BUILD_TESTS=OFF.


📂 Repository Structure

vje/
├─ src/
│  ├─ vje_core/          UI-free domain library (Qt Core + Gui only, no Widgets)
│  │  ├─ document/       JsonNode DOM, JsonPointer (RFC 6901), JsonDocument
│  │  ├─ editing/        Edit commands over QUndoStack, UndoController
│  │  ├─ services/       Lexer, parser, serializer, formatter, I/O, search, validation
│  │  ├─ convert/        CSV, XML, and YAML codecs
│  │  └─ tests/          Headless Qt Test suites
│  │
│  └─ vje_app/           Qt Widgets application
│     ├─ models/         Tree, form, and table QAbstractItemModels
│     ├─ views/          Tree pane, editor pane, Form / Text / Code views
│     ├─ controllers/    File lifecycle, the import / export converter table, find and go-to, printing
│     ├─ dialogs/        Settings, Go To, and XML import dialogs
│     ├─ services/       Settings, theming, selection, status, icons, dialogs, I/O
│     ├─ printing/       What a view hands the printer, and how that becomes a page
│     ├─ style/          Fluent metrics, focus highlighting, tone and palettes
│     └─ tests/          Offscreen Qt Test suites
│
├─ assets/
│  ├─ images/            Application icon, the two 47-glyph icon families, screenshots
│  └─ sample-files/      JSON and XML documents used by the manual smoke tests
│
├─ cmake/                CMake modules (external dependency acquisition)
├─ .github/              GitHub Actions CI (Windows + Linux build and test matrix)
├─ CMakeLists.txt        Top-level build
├─ CMakePresets.json     Per-toolchain configure / build / test presets
├─ README.md
└─ LICENSE

⚙️ Technical Details

  • Language: – C++20.

  • UI framework: – Qt 6 Widgets, over the Fusion style with a Fluent-like metrics proxy.

  • Build system: – CMake + Ninja, driven by presets.

  • Compiler: – GCC 13+ on both platforms. MinGW-w64 on Windows, the distribution toolchain on Linux.

  • Testing: – Qt Test + CTest. vje_core is tested headlessly under a QCoreApplication. The widget layer is tested on the offscreen platform plugin.

  • Two-target split: – vje_core holds the entire domain, model, editing, services, converters, and links no Qt Widgets, which is what keeps it headlessly testable. vje_app is the UI on top of it.

  • Document model: – A custom JsonNode DOM that preserves both member insertion order and raw number tokens, so a load-edit-save round trip changes only what you changed. Duplicate object keys are accepted on load and preserved; new duplicates are rejected on edit.

  • Undo: – QUndoStack / QUndoCommand, with commands targeting nodes by JSON Pointer and re-resolving on every redo and undo.

  • Cross-platform strategy: – One source tree, no windows/ / linux/ split. Platform differences are handled in CMake and a small isolated platform/ layer.


📄 License

Released under the MIT License - Copyright © 2024 Rohin Gosling.

Third-party assets

VJE ships two icon families, selected by Settings ▸ Appearance ▸ Interface style. The Classic family and the application icon are the project’s own hand-drawn artwork. The Fluent family is part vendored and part original: 32 of its 47 glyphs come from Microsoft’s Fluent System Icons, © 2020 Microsoft Corporation, used under the MIT licence. The notice travels with them at assets/images/icons/fluent/microsoft/LICENSE, and icon-map.json beside it records which glyph came from which upstream family. The remaining 15 are VJE’s own, for concepts Fluent has no equivalent of.

Exponentially Biased Debt Repayment Weight

GitHub

Parameter Explorer

TypeScript React PDF

Hero Banner

🔎 Overview

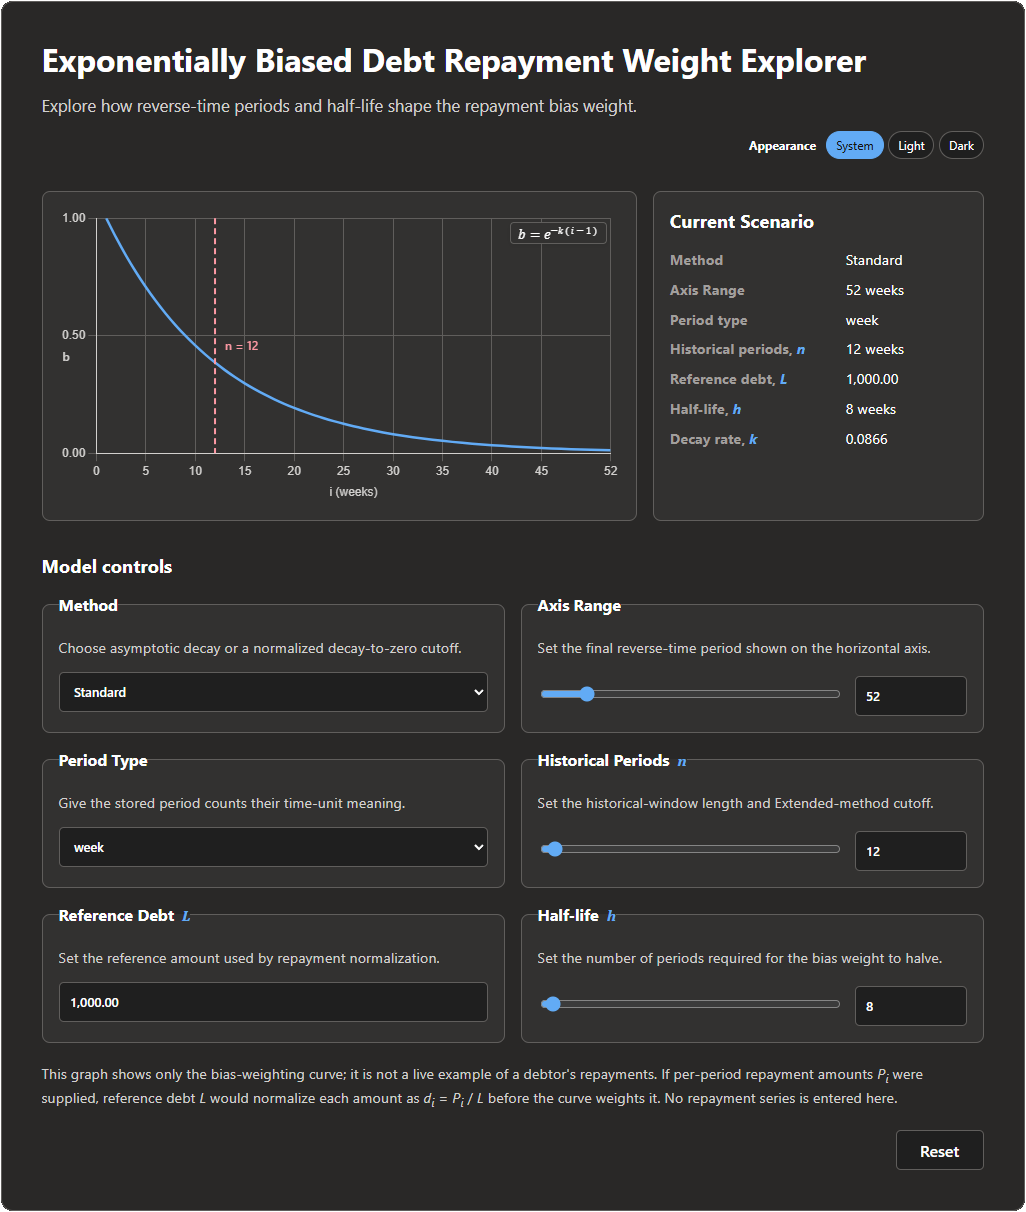
Parameter Explorer

This parameter explorer serves as a companion tool for the Exponentially Biased Debt Repayment Weight technical note.

Technical Note

The Exponentially Biased Debt Repayment Weight technical note defines an exponentially biased debt repayment weight, a closed-form method for ranking indebted users based on repayment history. Each repayment is normalized by a fixed reference debt amount and weighted by an exponential recency function, producing a transparent score that emphasizes recent repayment behavior while retaining a controlled contribution from older history.

  • The standard form of the method uses an asymptotic exponential decay function.
  • An extended form of the method introduces boundary-condition coefficients that force the decay function to reach exactly zero at a specified cutoff period.

The method requires no model training, labelled outcomes, demographic features, or third-party behavioral data. It is presented as an independent, non-peer-reviewed technical note and should be understood as a repayment-ranking heuristic rather than a calibrated credit-risk model.

🛠️ Resources

Intelligence Equation

GitHub

Playing Tic-Tac-Toe with Causal-Entropy, F=T∇Sτ\mathbf{F} = T \nabla S_\tau

Python PyYAML Rich

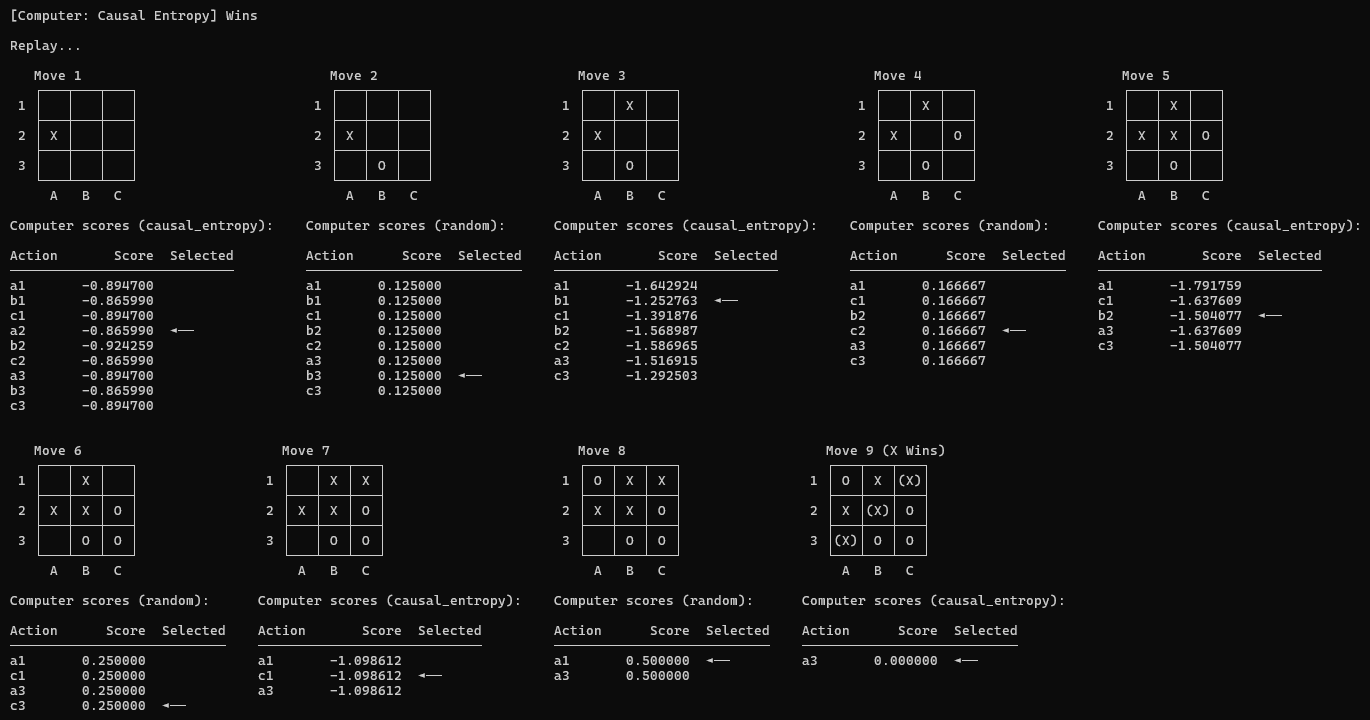
Computer-versus-computer Tic-tac-toe match in the terminal 

A Tic-tac-toe sandbox to experiment with Alex Wissner-Gross’s causal-entropic intelligence equation.

F=T∇Sτ\mathbf{F} = T \nabla S_\tau

In this application, the causal-entropy player treats each legal Tic-tac-toe move as a step into a future game tree. As defined by F=T∇Sτ\mathbf{F} = T \nabla S_\tau, it prefers moves whose successor states leave many legal future histories available, instead of directly optimizing a win/loss utility score. For this reason we observe that the causal-entropy favours placing marks on the edges of the board to minimise the probability of loosing, in favour of dominating the center to maximise the probability of winning.

…Basicaly, the agent that avoids loosing, lives longer, than the agent that tries to win.
…There may be some philisophical value in that observation somewhere.


📋 Table of Contents


✅ Requirements

  • Python 3.12 or newer
  • A UTF-8 terminal for Unicode boards; other encodings receive an ASCII fallback

⚙️ Setup

Create a virtual environment, then install the dependencies.

Windows PowerShell

python -m venv .venv
.\.venv\Scripts\python.exe -m pip install -r requirements.txt

Linux or macOS

python3 -m venv .venv
./.venv/bin/python -m pip install -r requirements.txt

Windows Git Bash

py -3.12 -m venv .venv
./.venv/Scripts/python.exe -m pip install -r requirements.txt

Use requirements-dev.txt only when you want the optional local test dependencies.


▶️ Running

From the project directory, display the available command-line options:

  • Windows

    .\run.bat --help
    
  • Linux

    ./run.sh --help
    

Run the example causal-entropy match:

  • Windows

    .\run.bat config\example.yaml
    
  • Linux

    ./run.sh config/example.yaml
    

Run a causal-entropy versus minimax experiment with candidate-score diagnostics:

  • Windows

    .\run.bat config\experiments\causal-entropy-x-minimax-o.yaml
    
  • Linux

    ./run.sh config/experiments/causal-entropy-x-minimax-o.yaml
    

The selected YAML profiles determine whether a match is human-human, human-computer, or computer-computer. Human turns accept coordinates from a1 through c3; malformed and occupied coordinates are explained and re-prompted.


🧩 Configuration

Each YAML file defines an x.y version number, optional application settings, reusable player profiles, one selected match, and presentation settings. An integer application.random_seed makes random strategy choices and random tie-breaks repeatable; omit it or set it to null for fresh random initialization on each run.

Match profilesPlay mode
Human + humanHuman versus human
Human + computerHuman versus computer
Computer + computerComputer versus computer

Player 1 is always X and moves first. Computer profiles select one of these strategies:

StrategyBehavior
randomUniform choice from legal actions
tacticalWin, block, center, corner, then edge
minimaxComplete optimal search using terminal utility
causal_entropyMaximizes future-history entropy without utility or tactical bonuses

The included files under config/ show the supported profile, match, and presentation settings.


🧮 Mathematical Overview

Wissner-Gross’s causal-entropic force,

F=T∇Sτ\mathbf{F} = T \nabla S_\tau

says that a system is driven toward states with greater future path entropy. Tic-tac-toe is discrete, so the application replaces the smooth gradient with an action-wise finite difference over legal moves.

Let ss be the current Tic-tac-toe state, A(s)A(s) the legal actions, and Tg(s,a)T_g(s,a) the successor state reached by playing action aa. The subscript in TgT_g distinguishes the game transition function from the temperature-like scalar TT in the intelligence equation. The formal Tic-tac-toe definition below uses TT for the same game transition function, matching the notation in the reference model.

For a configured horizon τ\tau, the causal-entropy strategy counts uniformly weighted future histories:

N0(s)=1N_0(s) = 1 Nτ(s)={1,if s is terminal,∑a∈A(s)Nτ−1(Tg(s,a)),otherwise.N_\tau(s) = \begin{cases} 1, & \text{if } s \text{ is terminal}, \\ \sum\limits_{a \in A(s)} N_{\tau - 1}(T_g(s,a)), & \text{otherwise}. \end{cases}

The path entropy used by the application is the natural logarithm of that count:

Sτ(s)=log⁡Nτ(s)S_\tau(s) = \log N_\tau(s)

Each candidate move is scored by the discrete analogue of T∇SτT \nabla S_\tau:

C(s,a)=θ[Sτ(Tg(s,a))−Sτ(s)]C(s,a) = \theta \left[S_\tau(T_g(s,a)) - S_\tau(s)\right]

where θ\theta is the configured temperature parameter. Since Sτ(s)S_\tau(s) is constant for all candidate moves from the same state, choosing the largest C(s,a)C(s,a) is equivalent to choosing the successor with the largest future path entropy.

The strategy intentionally does not add win/loss utility, tactical rules, or an opponent model. Wins, losses, and draws affect the score only by ending the future-history count. This makes the causal-entropy player a direct test of future optionality inside the Tic-tac-toe game defined below.


🎮 Tic-tac-toe - Mathematical Definition

Tic-tac-toe is modeled as a finite, deterministic, two-player, turn-based, zero-sum game of perfect information:

G=(S,s0,A,P,T,O,U)G = (S, s_0, A, P, T, O, U)

where SS is the legal reachable state space, s0s_0 is the initial state, A(s)A(s) is the legal action function, P(s)P(s) is the player-to-move function, T(s,a)T(s,a) is the transition function, O(s)O(s) is the outcome function, and Ui(s)U_i(s) is the utility function for player ii.

Let the row and column sets be:

R={1,2,3}R = \{1,2,3\} C={1,2,3}C = \{1,2,3\}

The set of board cells is:

D=R×CD = R \times C

The marks are:

M={X,O}M = \{X, O\}

The empty cell symbol is ∅\emptyset, and the set of possible cell values is:

Σ={X,O,∅}\Sigma = \{X, O, \emptyset\}

The set of players is:

I={X,O}I = \{X, O\}

Each player is identified with their mark. Player XX moves first, and player OO moves second.

A board is a function:

b:D→Σb : D \to \Sigma

The raw board space is:

B=ΣDB = \Sigma^D

Since ∣D∣=9|D| = 9 and ∣Σ∣=3|\Sigma| = 3, there are ∣B∣=39=19683|B| = 3^9 = 19683 raw board configurations. The legal state space SS is a subset of BB because some raw boards violate turn order or could not arise after normal play.

For a board bb, define the mark counts:

nX(b)=∣{d∈D:b(d)=X}∣n_X(b) = |\{d \in D : b(d) = X\}| nO(b)=∣{d∈D:b(d)=O}∣n_O(b) = |\{d \in D : b(d) = O\}|

Because XX moves first and players alternate turns, every reachable non-corrupt board satisfies:

nX(b)=nO(b)n_X(b) = n_O(b)

or:

nX(b)=nO(b)+1n_X(b) = n_O(b) + 1

Equivalently:

nX(b)∈{nO(b),nO(b)+1}n_X(b) \in \{n_O(b), n_O(b)+1\}

The set of winning lines is:

L={{(1,1),(1,2),(1,3)},{(2,1),(2,2),(2,3)},{(3,1),(3,2),(3,3)},{(1,1),(2,1),(3,1)},{(1,2),(2,2),(3,2)},{(1,3),(2,3),(3,3)},{(1,1),(2,2),(3,3)},{(1,3),(2,2),(3,1)}}\mathcal{L} = \left\{ \begin{aligned} &\{(1,1),(1,2),(1,3)\}, \\ &\{(2,1),(2,2),(2,3)\}, \\ &\{(3,1),(3,2),(3,3)\}, \\ &\{(1,1),(2,1),(3,1)\}, \\ &\{(1,2),(2,2),(3,2)\}, \\ &\{(1,3),(2,3),(3,3)\}, \\ &\{(1,1),(2,2),(3,3)\}, \\ &\{(1,3),(2,2),(3,1)\} \end{aligned} \right\}

For a player m∈Mm \in M, the win predicate is:

Wm(b)  ⟺  ∃L∈L such that ∀d∈L, b(d)=mW_m(b) \iff \exists L \in \mathcal{L} \text{ such that } \forall d \in L,\ b(d) = m

A board is full if no cell is empty:

F(b)  ⟺  ∀d∈D, b(d)≠∅F(b) \iff \forall d \in D,\ b(d) \neq \emptyset

Equivalently:

F(b)  ⟺  nX(b)+nO(b)=9F(b) \iff n_X(b) + n_O(b) = 9

A board is terminal if either player has won or the board is full:

Z(b)  ⟺  WX(b)∨WO(b)∨F(b)Z(b) \iff W_X(b) \lor W_O(b) \lor F(b)

The initial state s0s_0 is the empty board:

s0(d)=∅∀d∈Ds_0(d) = \emptyset \quad \forall d \in D

The legal state space is the smallest set S⊆BS \subseteq B such that:

  1. s0∈Ss_0 \in S.
  2. If s∈Ss \in S, ss is non-terminal, and a∈A(s)a \in A(s), then T(s,a)∈ST(s,a) \in S.
  3. If Z(s)Z(s), then A(s)=∅A(s) = \varnothing.

This recursive definition excludes boards that satisfy simple count constraints but could not arise during actual game play.

For non-terminal states, the player-to-move function is:

P(s)={X,if nX(s)=nO(s),O,if nX(s)=nO(s)+1.P(s) = \begin{cases} X, & \text{if } n_X(s) = n_O(s), \\ O, & \text{if } n_X(s) = n_O(s) + 1. \end{cases}

The function P(s)P(s) is undefined for terminal states because no player moves after the game ends.

An action is the selection of an empty board cell:

a∈Da \in D

The legal action set is the set of empty cells:

A(s)={d∈D:s(d)=∅}A(s) = \{d \in D : s(d) = \emptyset\}

For terminal states, no actions are legal:

Z(s)  ⟹  A(s)=∅Z(s) \implies A(s) = \varnothing

For a state s∈Ss \in S and legal action a∈A(s)a \in A(s), the successor state s′=T(s,a)s' = T(s,a) is:

s′(d)={P(s),if d=a,s(d),otherwise.s'(d) = \begin{cases} P(s), & \text{if } d = a, \\ s(d), & \text{otherwise}. \end{cases}

The transition function is only defined when a∈A(s)a \in A(s) and ¬Z(s)\neg Z(s).

The outcome function is:

O:S→{X-wins,O-wins,Draw,Ongoing}O : S \to \{\text{X-wins}, \text{O-wins}, \text{Draw}, \text{Ongoing}\}

with:

O(s)={X-wins,if WX(s),O-wins,if WO(s),Draw,if F(s)∧¬WX(s)∧¬WO(s),Ongoing,otherwise.O(s) = \begin{cases} \text{X-wins}, & \text{if } W_X(s), \\ \text{O-wins}, & \text{if } W_O(s), \\ \text{Draw}, & \text{if } F(s) \land \neg W_X(s) \land \neg W_O(s), \\ \text{Ongoing}, & \text{otherwise}. \end{cases}

The utility functions are:

UX:S→{−1,0,1}U_X : S \to \{-1,0,1\} UO:S→{−1,0,1}U_O : S \to \{-1,0,1\}

For player XX:

UX(s)={1,if O(s)=X-wins,−1,if O(s)=O-wins,0,if O(s)=Draw,0,if O(s)=Ongoing.U_X(s) = \begin{cases} 1, & \text{if } O(s) = \text{X-wins}, \\ -1, & \text{if } O(s) = \text{O-wins}, \\ 0, & \text{if } O(s) = \text{Draw}, \\ 0, & \text{if } O(s) = \text{Ongoing}. \end{cases}

For player OO:

UO(s)={1,if O(s)=O-wins,−1,if O(s)=X-wins,0,if O(s)=Draw,0,if O(s)=Ongoing.U_O(s) = \begin{cases} 1, & \text{if } O(s) = \text{O-wins}, \\ -1, & \text{if } O(s) = \text{X-wins}, \\ 0, & \text{if } O(s) = \text{Draw}, \\ 0, & \text{if } O(s) = \text{Ongoing}. \end{cases}

For terminal states, Tic-tac-toe is zero-sum:

UX(s)=−UO(s)U_X(s) = -U_O(s)

A history is a finite legal action sequence:

h=(a1,a2,…,ak)h = (a_1, a_2, \dots, a_k)

The induced state shs_h is obtained by applying those actions in order from s0s_0, and:

nX(sh)+nO(sh)=∣h∣n_X(s_h) + n_O(s_h) = |h|

A pure strategy for player i∈Ii \in I maps every state where that player moves to a legal action:

σi:Si→D\sigma_i : S_i \to D

where:

Si={s∈S:P(s)=i}S_i = \{s \in S : P(s) = i\}

and:

σi(s)∈A(s)\sigma_i(s) \in A(s)

For player XX, the minimax value function is:

VX:S→{−1,0,1}V_X : S \to \{-1,0,1\}

with:

VX(s)=UX(s)V_X(s) = U_X(s)

for terminal states, and:

VX(s)={max⁡a∈A(s)VX(T(s,a)),if P(s)=X,min⁡a∈A(s)VX(T(s,a)),if P(s)=O.V_X(s) = \begin{cases} \max\limits_{a \in A(s)} V_X(T(s,a)), & \text{if } P(s) = X, \\ \min\limits_{a \in A(s)} V_X(T(s,a)), & \text{if } P(s) = O. \end{cases}

Similarly, VO(s)=−VX(s)V_O(s) = -V_X(s) because the game is zero-sum. Tic-tac-toe is solved: the value of the initial state is:

VX(s0)=0V_X(s_0)=0

so optimal play results in a draw.


🗂️ Project Layout

PathResponsibility
domain/Immutable board, state, outcomes, coordinates, and authoritative game rules
players/Human and computer player abstractions
intelligence/Interchangeable computer strategies
presentation/Terminal rendering and interaction
config/Example and experiment YAML configurations
docs/Architecture notes, experiment baseline, and mathematical models
main.pyMinimal executable entry point
run.bat, run.shWindows and Linux terminal launchers
application.pyApplication composition and lifecycle
configuration.pyTyped YAML loading and aggregated validation
errors.pyShared application exception types

⚠️ Experiment Limitations

  • Each example result is one seeded game, not a statistical comparison.
  • In matches with random strategies or random tie-breakers, role assignment affects how the shared seeded random stream is consumed.
  • Execution times are machine-specific and are not acceptance thresholds.
  • The causal-entropy strategy intentionally ignores wins, losses, and opponent quality except through future path counts.
  • Tic-tac-toe is a small demonstration domain; these results do not establish a general measure of intelligence.
📜 License

Released under the MIT License - Copyright © 2022 Rohin Gosling.

UCI Chess Engine Template

GitHub

Rust Cargo UCI

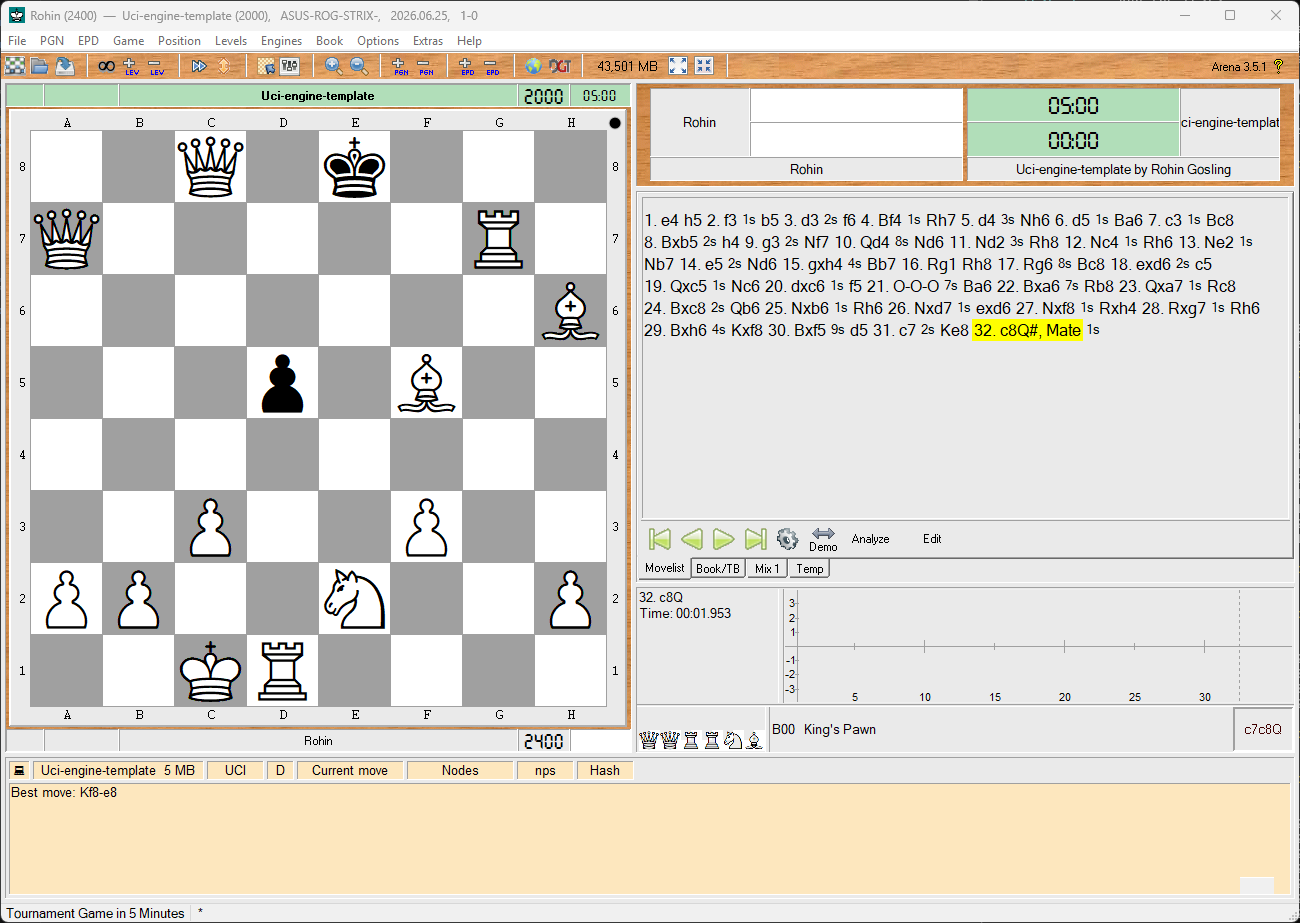
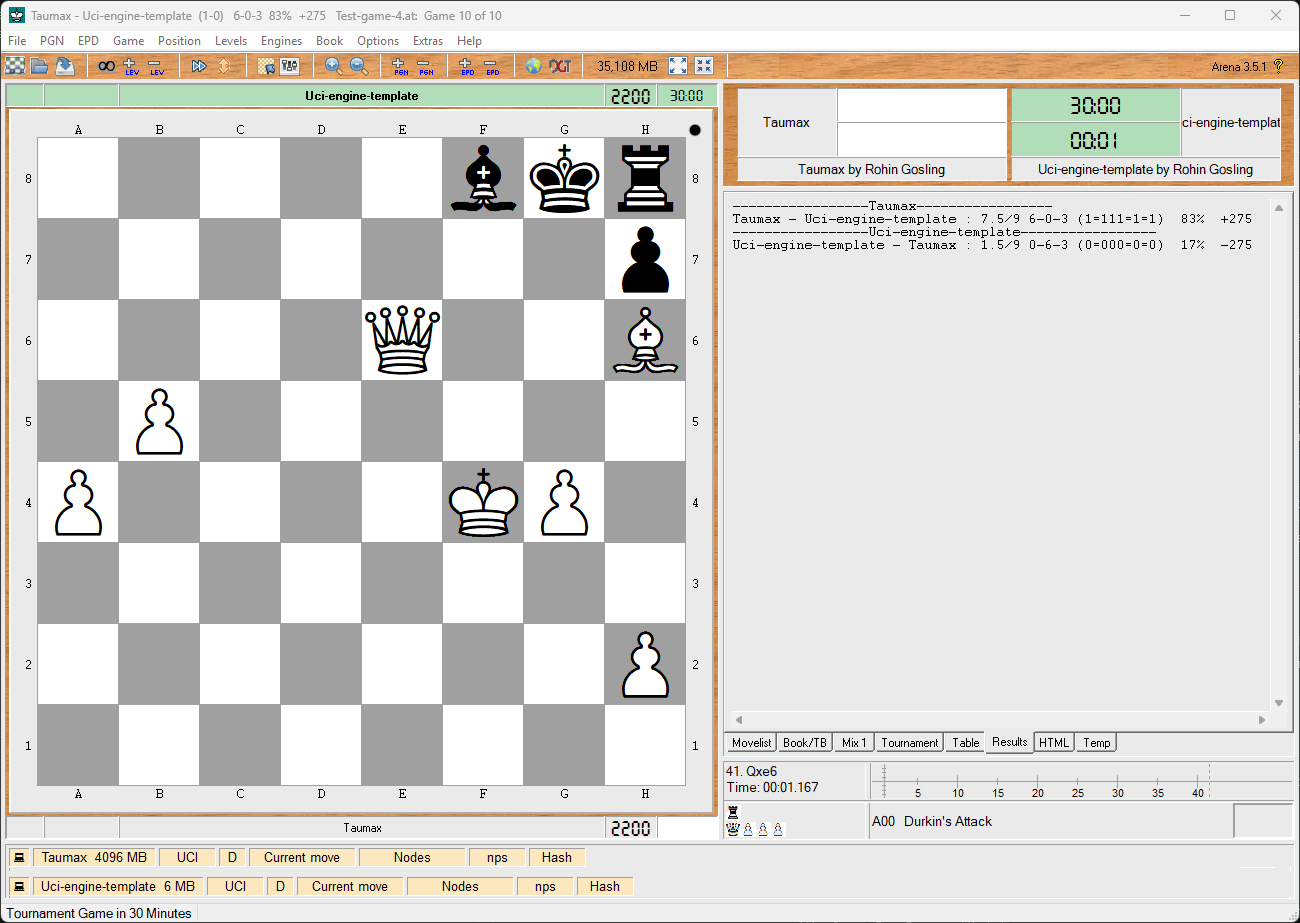
UCI Chess Engine Template running a test game in Arena

A minimal UCI-compliant chess engine, written in Rust.

This reference engine is intentionally simple: it reads UCI commands, maintains a legal chess position with cozy-chess, and replies to the UCI go command by choosing a random legal move. The goal is not chess strength; the goal is a small, readable structure that shows how Arena and other chess GUIs communicate with a command-line engine.

The move-selection layer is replaceable. Future selectors can add classical search, heuristics, neural-network inference, or other experiments behind the same MoveSelector trait.

📋 Table of Contents


✅ Requirements

  • Rust stable
  • Cargo
  • A UCI-compatible chess GUI such as Arena, Cute Chess, BanksiaGUI, or another GUI for manual testing

The project has no GUI, network service, async runtime, opening book, or GPL dependency in the default template.


⚙️ Setup

From the project root, build the release binary:

cargo build --release

The Windows executable is created at:

target/release/uci-engine-template.exe

Run the automated tests:

cargo test

Run the linter with warnings denied:

cargo clippy -- -D warnings

▶️ Running

Run the debug build directly:

cargo run

Run the release executable after building:

.\target\release\uci-engine-template.exe

The engine starts silently and waits for UCI commands on standard input. It does not print a banner or prompt.


♟️ Manual UCI Smoke Test

After starting the engine, type:

uci
isready
position startpos
go movetime 1000
quit

Expected response shape:

id name UCI Engine Template Rust
id author Rohin Gosling
uciok
readyok
bestmove <legal-uci-move>

When the current position has no legal moves, the engine returns the UCI null move:

bestmove 0000

🧩 Arena Installation

  1. Build the release binary with cargo build --release.
  2. Open Arena.
  3. Install a new engine.
  4. Select target\release\uci-engine-template.exe.
  5. Choose UCI if Arena asks for the engine protocol.
  6. Start a game or analysis session.

Arena launches the executable as a command-line process. Commands flow into the engine through standard input, and UCI protocol responses flow back through standard output.


🧠 Engine Behavior

The current implementation supports the core commands needed by Arena and other UCI-compatible GUIs.

CommandBehavior
uciPrints engine identity and uciok
isreadyPrints readyok
ucinewgameResets the session to the starting position
position startposSets the board to the standard starting position
position startpos moves ...Sets the start position and applies each UCI move
position fen ...Sets the board from FEN
position fen ... moves ...Sets the FEN position and applies each UCI move
go ...Starts move selection and prints one random legal bestmove
stopRecognized no-op for the instant random selector
debug on, debug offToggles diagnostic logging to standard error
setoption ...Recognized and ignored for now
quitExits cleanly

Standard output is reserved for protocol messages such as uciok, readyok, and bestmove. Diagnostics and debug messages go to standard error so chess GUIs never try to parse logs as protocol text.

Invalid position commands are rejected as a whole. The previous valid position is retained, and a diagnostic is written to standard error.


🗂️ Project Layout

project-root/
├─ Cargo.toml
├─ Cargo.lock
├─ LICENSE
├─ README.md
├─ rustfmt.toml
├─ docs/
│  ├─ architecture.md
│  └─ spec.md
│
├─ src/
│  ├─ main.rs
│  ├─ lib.rs
│  ├─ board/
│  │  ├─ mod.rs
│  │  └─ position.rs
│  │
│  ├─ engine/
│  │  ├─ mod.rs
│  │  ├─ random.rs
│  │  ├─ selector.rs
│  │  └─ session.rs
│  │
│  ├─ search/
│  │  ├─ limits.rs
│  │  └─ mod.rs
│  │
│  └─ uci/
│     ├─ command.rs
│     ├─ driver.rs
│     ├─ mod.rs
│     ├─ parser.rs
│     └─ response.rs
│
└─ tests/
   ├─ uci_go.rs
   ├─ uci_handshake.rs
   └─ uci_position.rs

🔌 Extension Point

Move choice is controlled by the MoveSelector trait:

pub trait MoveSelector {
    fn select_move(
        &mut self,
        position: &crate::board::position::Position,
        limits: &crate::search::limits::SearchLimits,
    ) -> Option<cozy_chess::Move>;
}

RandomMoveSelector is the first concrete implementation. Future selectors can replace it without changing the UCI driver, because the driver asks the EngineSession for a move rather than depending on a specific search algorithm.

Possible future selectors include material-only heuristics, minimax, alpha-beta search, Monte Carlo tree search, neural-network inference, or experimental entropy-based move selection.


⚠️ Template Limitations

  • The engine chooses random legal moves and does not evaluate positions.
  • stop is a no-op because move selection is immediate.
  • setoption is recognized but no configurable engine options are exposed yet.
  • Time controls are parsed into SearchLimits, but the random selector ignores them.
  • There is no opening book, tablebase support, pondering, multithreading, or GUI.

📄 License

Released under the MIT License - Copyright © 2024 Rohin Gosling.

Data Probe

GitHub

Assembly C C++ DOS

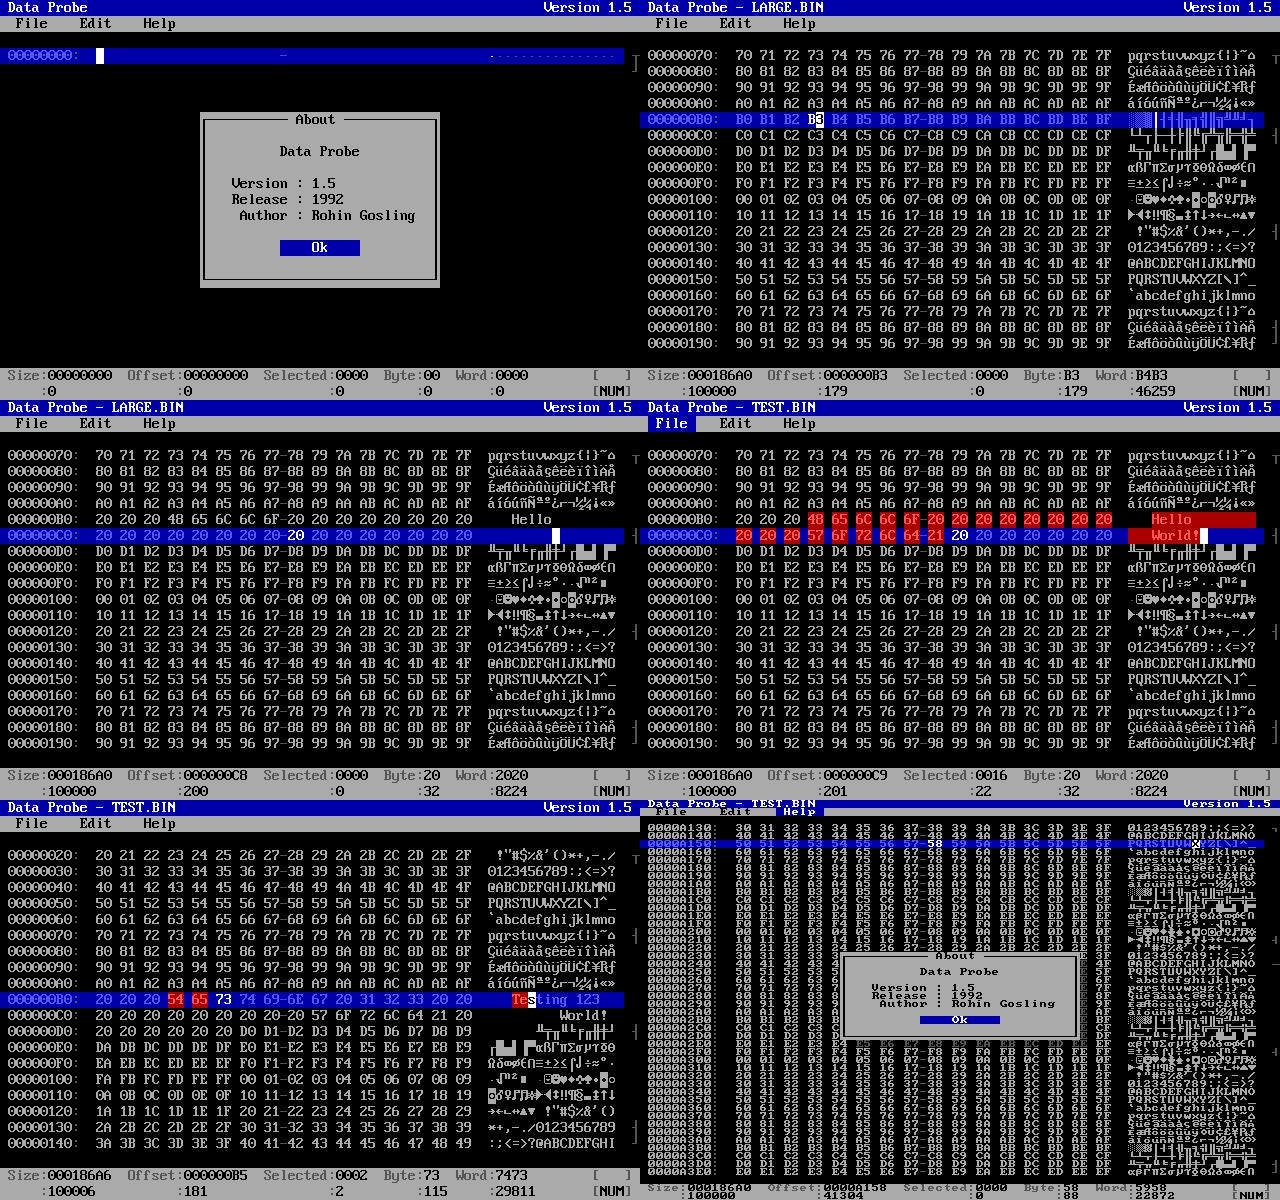
Data Probe editing a binary file

📑 Table of Contents


✨ Features

Data Probe is a light weight HEX editor for DOS that runs on any x86 machine. Data Probe was written in the 1990’s but still serves as a useful tool for any retro computing environment in use today.

  • Insert and overwrite editing, selection blocks, and delete/backspace operations that track logical file length.
  • Chunked paging engine: edit files larger than available memory via a sliding chunk window sized from free far memory.
  • CUA / Turbo C++ IDE clipboard: Copy = Ctrl+Ins, Cut = Shift+Del, Paste = Shift+Ins (mode-aware paste: inserts in insert mode, overwrites in overwrite mode).
  • Find / Replace across the whole file, search plain strings or byte-pair sequences, paging chunks in and out as needed.
  • Export to text and printing, either the whole file or the current selection only.
  • Live dual status bars (hex and decimal): size, offset, selected, byte, and word, with configurable little-/big-endian word order.
  • Relative-position margin marking top-of-file, bottom-of-file, chunk boundaries, and the cursor’s scaled file position.
  • Runtime settings (rows, address radix, hex divider, position margin, buffer size, insert default, word byte-order, About-dialog-at-launch) that persist to a hand-editable CONFIG.INI.

🚀 Quickstart

A ready-to-run DPROBE.EXE is attached to the GitHub release. Download the latest DPROBE.EXE and drop it anywhere on your MS-DOS machine or in a folder you can reach from DOSBox. The executable is fully self-contained; on first run it writes a CONFIG.INI next to itself for your saved settings, so nothing else needs to be installed.

Data Probe takes no command-line arguments, you load files from inside the program. Start it, press F10 to drop the menu bar, and choose File → Open… to browse to a file. Press F10 again (or Esc) at any time for the menus, and open Help → User Guide for the full key map.

Run on a real MS-DOS PC

Copy DPROBE.EXE onto the machine, for example into C:\TOOLS, then run it from that directory:

C:\TOOLS> DPROBE

Data Probe needs MS-DOS 3.30 or later and an 80286 or better CPU (it will run on any 386/486 and beyond). That is the only requirement; there is no installer and no runtime to set up.

Run in DOSBox

If you are on a modern PC, DOSBox gives you the same experience. Put DPROBE.EXE in a folder on your host, say C:\DOS\TOOLS on Windows, then start DOSBox, mount that folder as a DOS drive, and run it:

Z:\> mount c C:\DOS\TOOLS
Z:\> c:
C:\> DPROBE

For a full-screen, sharper display, press Alt+Enter to toggle DOSBox to full screen.

Run Data Probe from anywhere (add it to the PATH)

To use Data Probe as a system-wide tool, launchable by typing DPROBE from any directory, put its folder on the DOS PATH.

On an MS-DOS PC, keep DPROBE.EXE in a dedicated tools directory such as C:\TOOLS and add that directory to the PATH line in C:\AUTOEXEC.BAT:

PATH=C:\DOS;C:\TOOLS

Reboot (or re-run AUTOEXEC.BAT) so the new PATH takes effect. After that, DPROBE works from any drive or directory.

In DOSBox, do the same thing from the [autoexec] section at the bottom of your dosbox.conf (or dosbox-0.74-3.conf), so the mount and PATH are set up automatically every time DOSBox starts:

[autoexec]
mount c C:\DOS\TOOLS
c:
set PATH=%PATH%;C:\TOOLS

With that in place, launching DOSBox drops you at a C:\ prompt from which DPROBE runs no matter which directory you have changed into.


🔨 Build

Requires MS-DOS, or a DOS emulator like DOSBox, with the Borland C++ 3.1 command-line driver (bcc) on the PATH. The scripts run inside an already-configured DOSBox session and are launched from the build/ directory:

cd build
BUILD.BAT

BUILD.BAT compiles the four modules, MicroText (mtext.c, C with inline assembly), MicroApp (mapp.cpp, C++), the INI settings library (ini.cpp, C++), and DataProbe (hexview.cpp, filebuf.cpp, dprobe.cpp, C++), all with the large memory model (-ml), then links the six objects into dprobe.exe. The .obj, .exe, and build.log artifacts land in build/.

Clean

Run CLEAN.BAT from the build/ directory to remove build artifacts (*.obj, *.exe, build.log).

📂 Repository Structure

Data Probe/
├─ src/
│  ├─ M-TEXT/           MicroText: C + inline-asm text library
│  │  ├─ mtext.c
│  │  └─ mtext.h
│  │
│  ├─ M-APP/            MicroApp: C++ user interface class framework
│  │  ├─ mapp.cpp
│  │  └─ mapp.h
│  │
│  ├─ INI/              INI: C++ INI-file settings library
│  │  ├─ ini.cpp
│  │  └─ ini.h
│  │
│  └─ D-PROBE/          DataProbe: HEX editor application
│     ├─ dprobe.cpp
│     ├─ dprobe.h
│     ├─ hexview.cpp
│     ├─ hexview.h
│     ├─ filebuf.cpp
│     └─ filebuf.h
│
├─ build/               Build scripts (BUILD.BAT compiles + links DPROBE.EXE)
│  ├─ BUILD.BAT
│  └─ CLEAN.BAT
│
├─ test/                Per-module test drivers
├─ README.md
└─ LICENSE

⚙ Technical Details

  • Target OS: MS-DOS 3.30, or above.
  • Target CPU: 80286 / 80386 / 80486, real mode.
  • Memory model: Large (-ml), far code + far data, with a farmalloc-ed file buffer.
  • Display: Direct 0xB800 hardware text mode (80×25, or 43/50 rows), one word per cell (character + attribute).
  • Double buffering: The UI composites into an off-screen TEXTBUFFER, then a single FlipScreenBuffer (REP MOVSW) blits it to 0xB800, flicker-free.
  • Chunked paging: A sliding chunk window, sized from free far memory (farcoreleft), lets Data Probe edit and search files larger than available RAM.
  • Toolchain: Borland C++ 3.1 (bcc), with MicroText’s asm { } blocks handled by the built-in inline assembler (no separate TASM pass).

Dependency Diagram

Data Probe is dependant on three other projects.

  • INI: An INI configuration file management library.
  • Microtext: A low level text mode library written in C and inline x86 assembly language.
  • MicroApp: A visual text mode application framework, that is itself dependant on MicroText.
  • Data Probe: An MS-DOS HEX Editor (this application), that depends on MicroApp and INI.

  ┌───────────────────────────────────────┐
  │              Data Probe               │
  └──────┬────────────┬────────────┬──────┘
         │            │            │
         ▼            │            ▼
  ┌─────────────┐     │     ┌─────────────┐
  │  MicroApp   │     │     │     INI     │
  └──────┬──────┘     │     └─────────────┘
         │            │
         ▼            ▼
  ┌──────────────────────────┐
  │        MicroText         │
  └──────────────────────────┘

📄 License

Released under the MIT License - Copyright © 1992 Rohin Gosling.

Steam Achievement Browser

GitHub

HTML5 CSS3 JavaScript TypeScript Cloudflare Workers

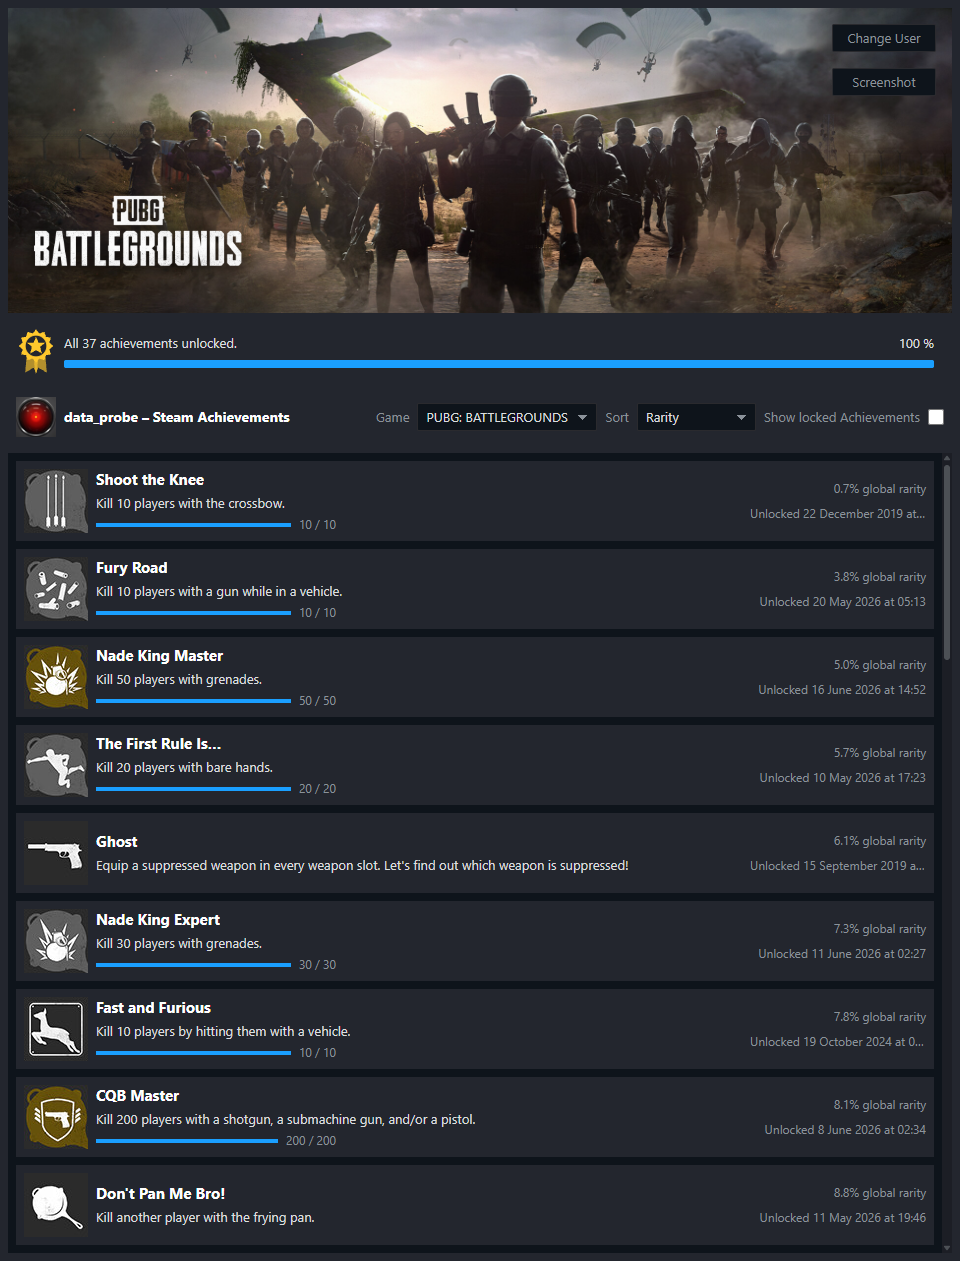
Steam Achievement Browser screenshot ✨ Try Steam Achievements Browser ✨

Browse and sort your Steam achievements for any publicly visible Steam library.

  • Enter a SteamID64, Steam profile URL, or vanity identifier, then choose Continue or press Enter to access yours or anyone else’s publicly visible Steam Library. No Steam sign-in is required.

    • The application reads only public Steam data, so the profile’s Game details privacy setting must be public.
    • If the profile’s Game details privacy setting is set to private, no game or achievement data will be accessible.
  • Choose a game from the dropdown menu, then sort achievements by rarity, name, or unlock date.

  • Locked achievements can be filtered with the Show Locked Achievements checkbox.

  • Save achievements as a PNG image with the Screenshot button.

📜 License

Released under the MIT License - Copyright © 2026 Rohin Gosling.

Steam and the Steam logo are trademarks and/or registered trademarks of Valve Corporation. Game names, achievement names, descriptions, icons, and artwork remain the property of their respective owners. This is an independent, unofficial project and is not affiliated with or endorsed by Valve Corporation or any game publisher.

Gem

GitHub

Telnyx Python TypeScript

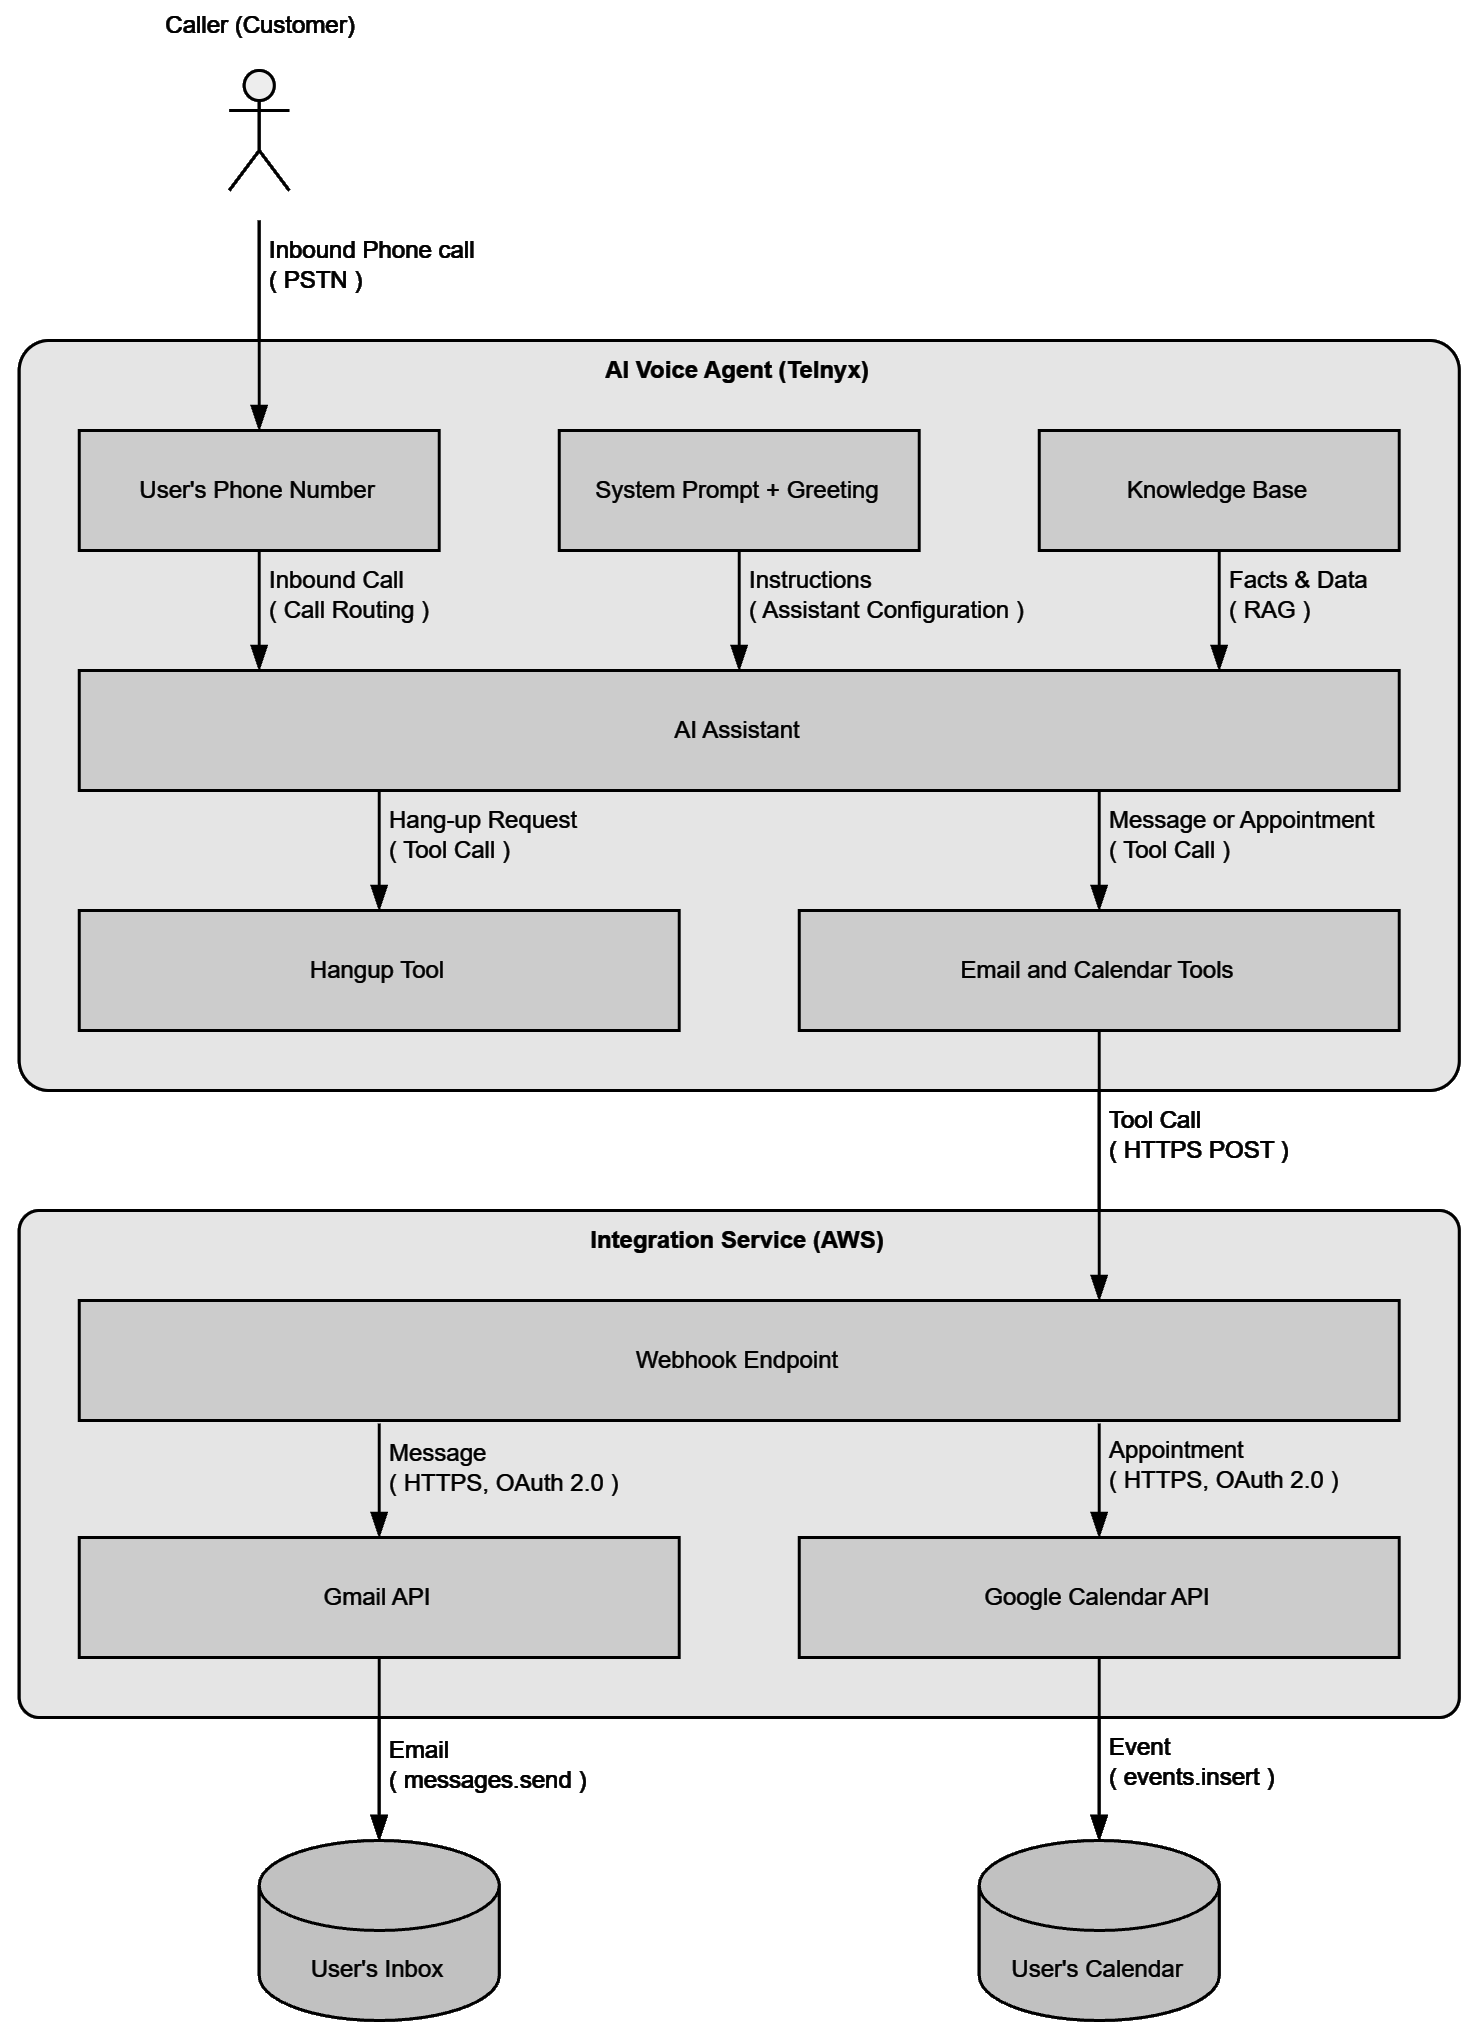
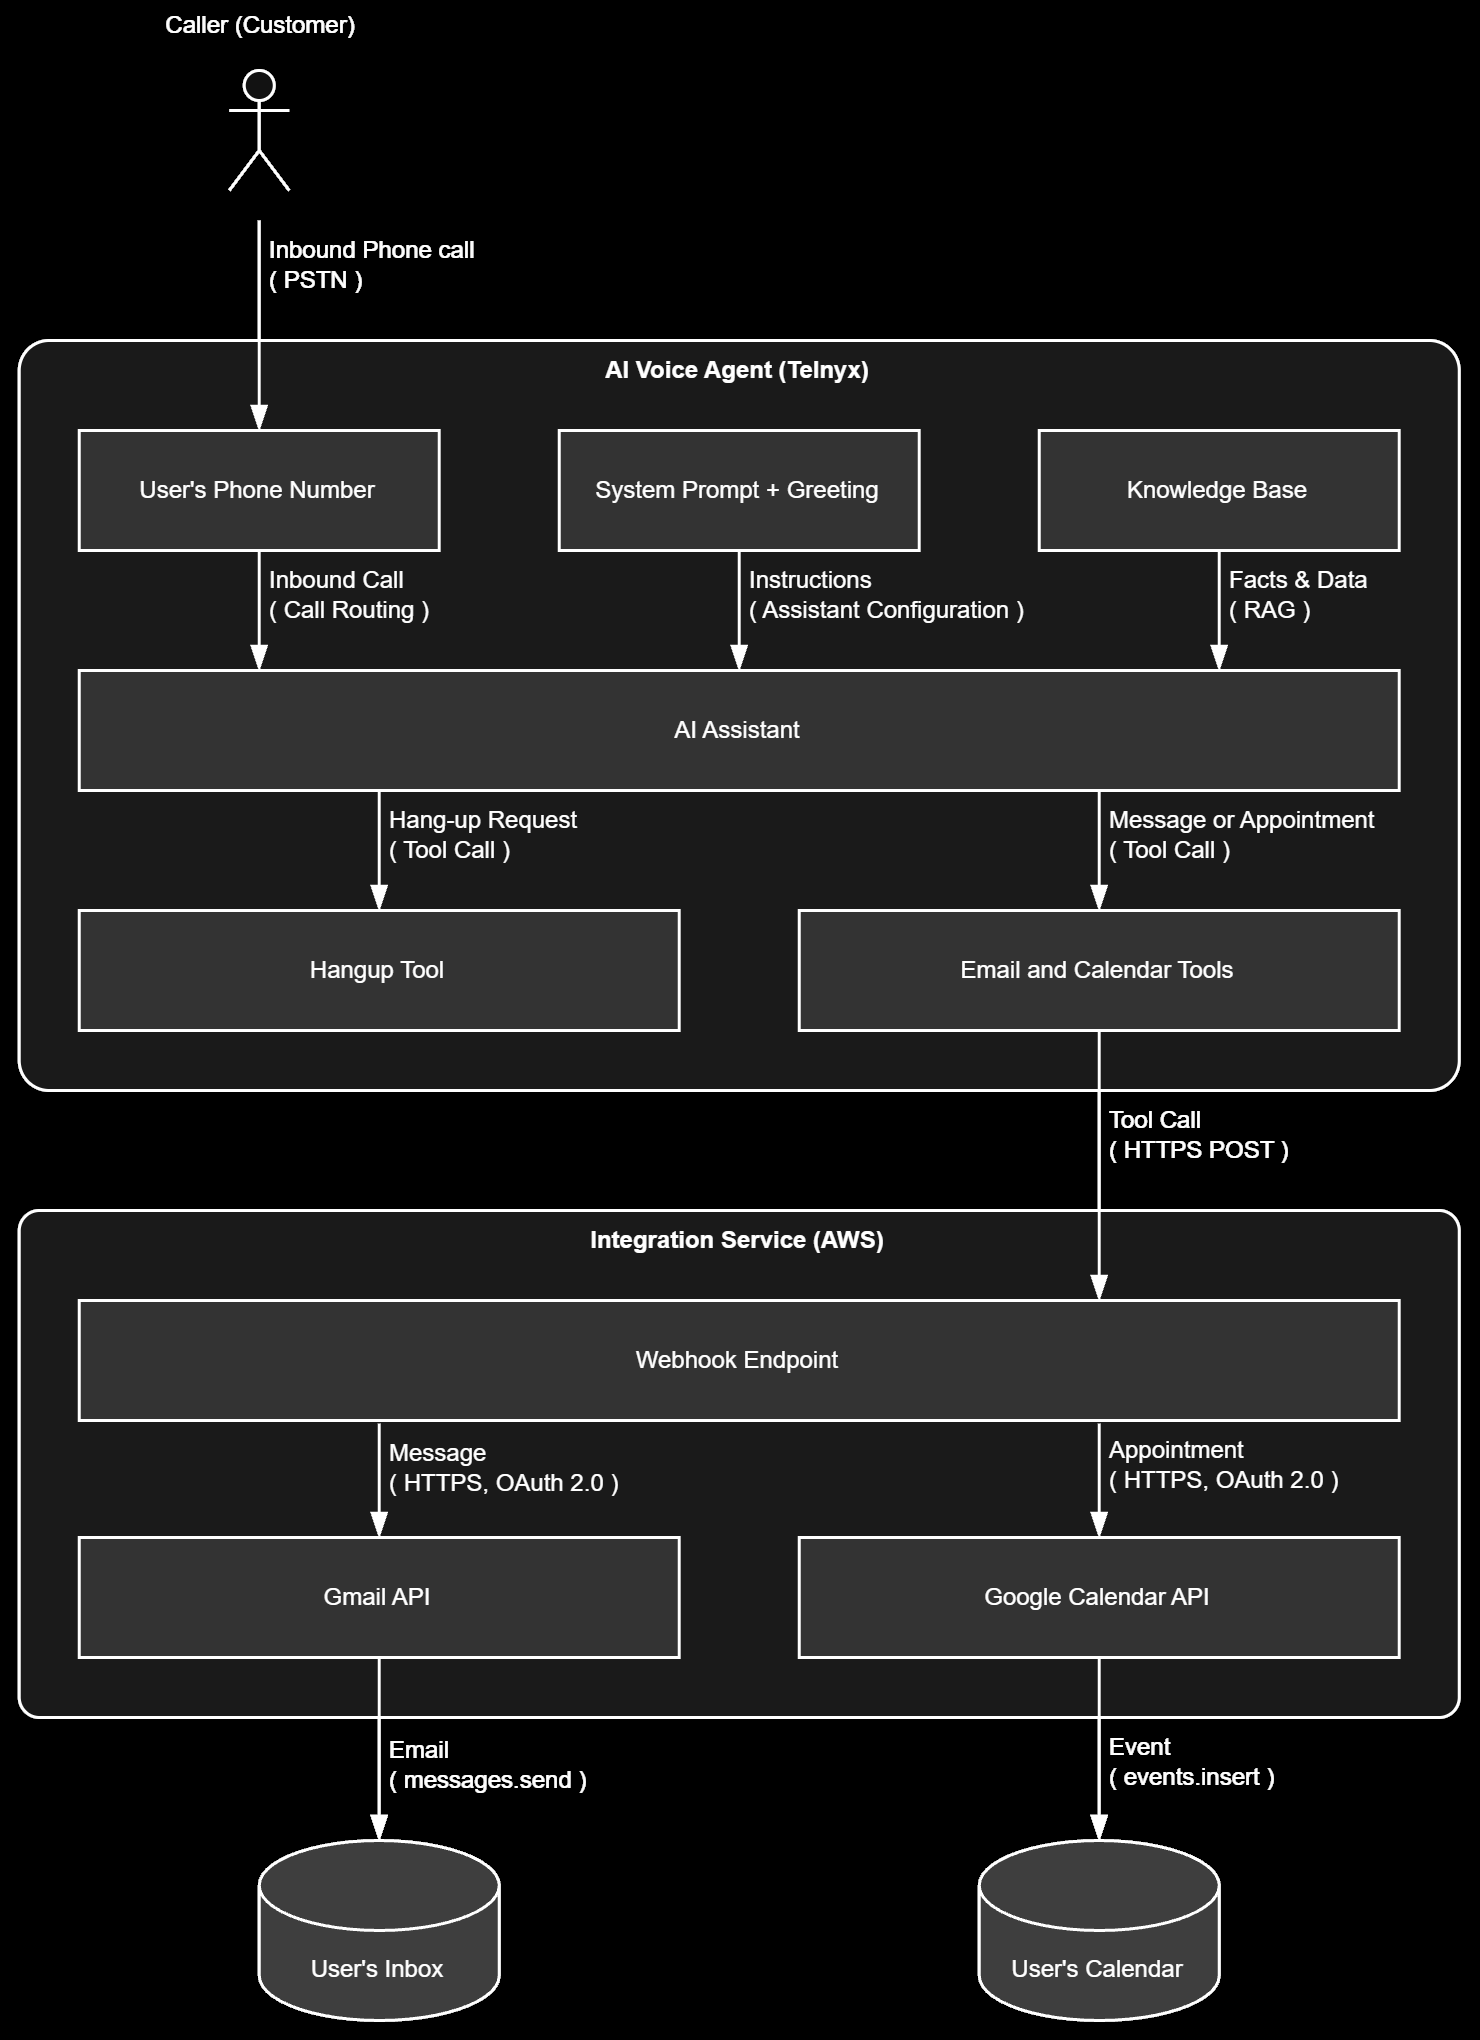
Context diagram of Gem: a caller's phone call reaches the user's phone number and AI Assistant in Telnyx; the assistant's tool calls go to an integration service that emails the user their messages and books events in their calendar Context diagram of Gem: a caller's phone call reaches the user's phone number and AI Assistant in Telnyx; the assistant's tool calls go to an integration service that emails the user their messages and books events in their calendar


Gem is an AI telephone assistant: an intelligent answering machine that the user connects to their phone number. When a call comes in that the user cannot take, Gem answers it, finds out who is calling and why, helps with simple requests using what the user has told it, and otherwise takes a clear message or books an appointment. The user receives the message by email, and any appointment appears in their calendar.

Gem runs as a Telnyx AI Assistant. Telnyx provides the telephony, speech recognition, language model, and speech synthesis; Gem’s own integration service connects the assistant to the user’s email and calendar.

The name is inspired by the character Gem in the film Tron: Legacy. Gem is under development and the current build is a single-user MVP, and What Gem Does Today shows the current status.

✨ What Gem Does Today

CapabilityStatus
Answer inbound calls with a spoken greeting and identify the callerLive
Answer simple questions from a built-in knowledge section (availability, contact details)Live
Take a structured message: caller name, callback number, reason, time sensitivityLive
Close the call cleanly and hang upLive
Email the message to Rohin (Gmail)Planned
Book appointments in Rohin’s Google CalendarPlanned
Serve knowledge from a Telnyx Knowledge Base instead of the system promptPlanned
Migrate from Cloudflare to AWSPlanned

Gem cannot transfer calls or look up private data; when a request is outside its abilities it offers to take a message instead.

🔧 How It Works

Connect a number. The user connects Gem to their phone number through Telnyx. From then on, callers who reach that number are answered by Gem.

Tell Gem what it needs to know. Gem’s behaviour comes from a system prompt, voice rules, how to take a message, how to end a call, and a Knowledge Base holding what the user wants Gem to know: who the user is, when they are usually available, how to pronounce their name, and the answers to the questions callers most often ask. Gem uses only these facts; it never invents information, calendar entries, or transfers.

Handle the call. Gem greets the caller and, one short question at a time, works out what they need. Simple questions it answers from the Knowledge Base. Anything else becomes a message, caller name, callback number, reason, and how urgent it is, read back once for confirmation. If the caller wants to meet, Gem checks the user’s calendar and agrees a time. Telnyx injects live context into every call: the channel, the current time in the user’s time zone, and the caller’s number.

Deliver the outcome. Every action Gem takes is a Telnyx tool backed by the integration service: a taken message is emailed to the user, and an agreed time becomes an event in the user’s calendar. When the request is handled, Gem closes the call.

Sentinel

GitHub

Under construction - Sentinel is still in development

Python FastAPI Pydantic SQLite Anthropic ONNX Runtime Ollama Open WebUI Telegram Twilio

Status - In development. ⛏️

A secure, self-evolving personal AI agent with zero external daemons, installed via a single .exe.

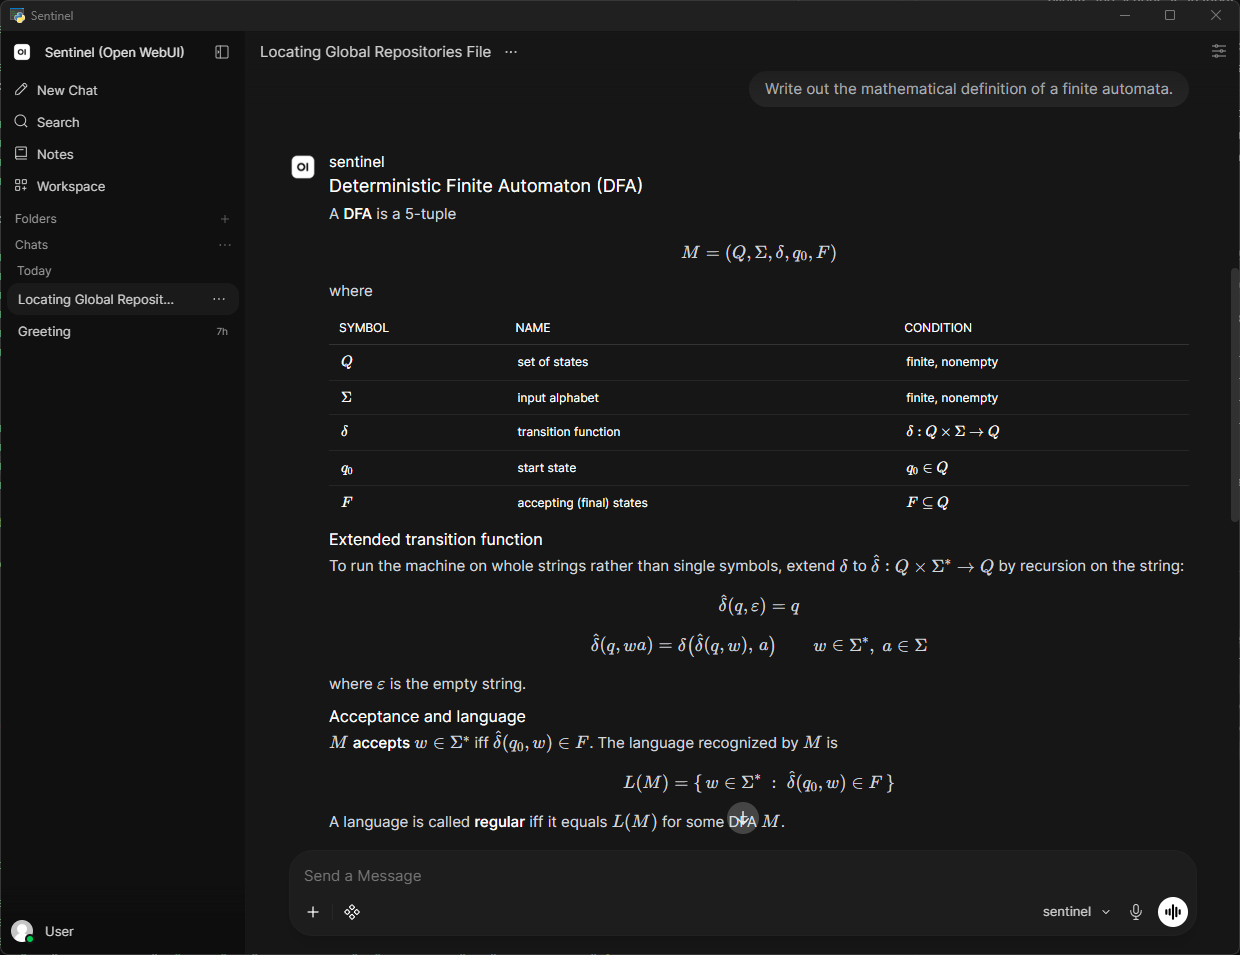
Sentinel screenshot

Sentinel is an autonomous AI agent that runs as a native Windows desktop application. It wraps the API of any LLM in an OpenAI-compatible API, including both cloud and local models. With optional local LLM fallback in the event that a cloud model become unavailable during operation for any reason. Sentinel offers a branded Open WebUI chat interface in a native pywebview window. The agent reasons, uses tools, maintains memory, evolves its identity over time, and communicates across multiple channels.

📑 Table of Contents

✨ Features

CapabilityDescription
Agentic loopTrigger → prompt assembly → LLM call → tool dispatch → loop, with hard iteration, loop, and tool timeouts.
Three-tier memoryWorking, episodic, and semantic memory over SQLite with sqlite-vec vector search.
Private by defaultEmbeddings are generated locally on-device. Memories are never sent to a third-party service.


Identity evolutionThe agent’s self-description is revised over time from its own accumulated experience.

Skill frameworkSandboxed tool and channel skills, each declared by a skill.json manifest, with a CLI for scaffolding, validation, and installation.
Multi-channelChat, email, Telegram, WhatsApp, and phone. All normalised through a single channel router.
VoiceLocal-first speech-to-text (faster-whisper) and text-to-speech (Piper), with cloud fallback.
SecurityOS-level sandboxing via Job Objects and ACLs, OS keyring credential storage, encryption at rest, and a domain-allowlisted egress proxy.
Single-file installEmbedded Python, a PyInstaller launcher, and an Inno Setup installer. No external daemons, no service, no administrator rights.

🧩 Architecture

Sentinel runs entirely in-process or as managed subprocesses; there is no external daemon, message broker, or database server to install. It is a desktop application running in your own user session, not a background Windows service.

LayerTechnology
LanguagePython 3.12 (async throughout)
API gatewayFastAPI + uvicorn, exposing an OpenAI-compatible endpoint
Language modelAnthropic Claude API (primary), Ollama (optional local fallback)
Embeddingsall-MiniLM-L6-v2 via ONNX Runtime, local, offline, 384-dimensional
StorageSQLite in WAL mode, sqlite-vec for vector search, diskcache for caching
InterfaceOpen WebUI in a native pywebview window, with a pystray system tray
IsolationWindows Job Objects, ACLs, and an egress proxy with a domain allowlist

✅ Requirements

  • Windows 10 or 11 (64-bit)
  • Python 3.12 (bundled with the installer build; required only for running from source)
  • An Anthropic API key
  • Optionally, a local Ollama installation for offline LLM fallback

No Docker, no WSL, no Node.js, and no system-wide Python installation are required.

🚀 Getting Started

# Install dependencies
pip install -r requirements.txt

# Run the application
python -m sentinel start

Credentials are never read from the repository or from configuration files. Sentinel stores them in the operating system keyring on first run.

💻 Development

# Run the automated test suite
pytest -m "automated" --tb=short -q

# Type checking
mypy src/sentinel/ --strict

# Linting
ruff check src/ tests/

🙏 Acknowledgements

📄 License

Released under the MIT License - Copyright © 2025 Rohin Gosling.

Sentinel bundles no Open WebUI source. It is installed as an ordinary dependency and remains under its own licence, whose branding terms Sentinel observes.

Service Provider Agnostic LLM Chatbot

GitHub

Reference Application - Version: 2.1

Python Rich pytest OpenAI Anthropic Gemini

The chatbot running in a terminal: startup banner, a Markdown-rendered reply, and the /help command list   The data/config.toml configuration file: provider, model, rendering, logging, chat-log, and colour sections

A general-purpose, service-provider agnostic, terminal-based LLM chat agent. Intended as a clean, object-oriented starting point for building LLM chatbot applications. It demonstrates a turn-based conversation loop with history, Markdown rendering, a small command system, swappable backends, external configuration, and diagnostic logging.

📖 Table of Contents

  1. ✨ Features
  2. 🏛️ Architecture
  3. 🛠️ Installation
  4. 🚀 Usage
  5. ⚙️ Configuration
  6. ⌨️ Commands
  7. 🧪 Tests
  8. 📜 License

1. ✨ Features

  • Turn-based terminal chat with full conversation history.
  • Rich Markdown rendering of replies, headings, lists, emphasis, and code blocks, with a plain-text fallback for dumb terminals or when piping to a file.
  • Streaming responses, shown live as they arrive and then re-rendered as formatted Markdown.
  • Configurable terminal colours: Every kind of output (section headers, prompt labels, AI/user text, banner field values) is themable from the [colors] config section, using any Rich colour (palette name, color(N), hex #rrggbb, or rgb(r,g,b)); a bad value falls back to the built-in default.
  • Configurable startup introduction in three modes: silent (none), a canned greeting (unprompted), or a model-generated self-introduction (prompted).
  • Slash-command system: /help, /exit (alias /stop), /clear, /system, /save, /reset, matched case-insensitively, with a configurable command prefix. /help is generated from the command registry, so new commands list themselves automatically.
  • Multi-line input: End a physical line with \ to continue the prompt on the next line; the joined text is sent as a single message (and the echoed \ is tidied from the screen on an ANSI-capable terminal).
  • Pluggable provider abstraction: The conversation core talks to a normalized ChatProvider interface, so OpenAI and Anthropic (Claude) both ship as backends and others can be added without touching the UI, conversation, or rendering code. The active backend is chosen by configuration.
  • External TOML configuration (data/config.toml) with safe built-in defaults, so the app runs even with no config file and degrades gracefully on a missing or malformed one.
  • Diagnostic logging to the console (warnings and above) and a rotating file under log/, kept separate from the chat output, with an optional token-usage tracker (per response plus a running session total).
  • Automatic chat-log persistence to numbered text files under chat_log/.
  • Working-directory independence: All data and output paths are anchored to the project root.
  • Automated, offline pytest suite.

2. 🏛️ Architecture

The application is composed of small, single-responsibility modules under src/:

ModuleResponsibility
main.pyEntry point: load configuration, build and run the application.
application.pyOrchestration, terminal UI, command manager, and the startup introduction.
language_model.pyProvider-agnostic conversation domain: history, model parameters, chat-log persistence.
providers/The normalized ChatProvider interface, the OpenAIProvider and AnthropicProvider, and a name → provider registry.
renderer.pyRich Markdown rendering of replies and errors, with a plain-text fallback.
config.pyLoads data/config.toml, merged over built-in defaults, into a typed configuration object.
logging_setup.pyConfigures console and rotating-file logging.
constants.pyCentralized constants and the command registry.
utility.pySmall shared helpers (UTF-8 text loading).

Each vendor SDK is imported in exactly one place, the openai package only in providers/openai_provider.py, the anthropic package only in providers/anthropic_provider.py, so a new backend is a single, local change: implement ChatProvider, then register the name.

3. 🛠️ Installation

Prerequisites

  • Python 3.11 or later (the configuration loader uses the standard-library tomllib).
  • An API key for the active backend, ANTHROPIC_API_KEY for Anthropic (the shipped default) or OPENAI_API_KEY for OpenAI. The backend is selected by [provider].name in data/config.toml, and its key is read at startup.

Clone

git clone https://github.com/rohingosling/service-provider-agnostic-chatbot-python.git
cd service-provider-agnostic-chatbot-python/src

Virtual environment

On Windows, helper batch files manage the virtual environment from the src/ directory:

venv_create.bat                 :: create and activate the virtual environment
venv_install_requirements.bat   :: install the pinned runtime dependencies

venv_activate.bat, venv_deactivate.bat, and venv_delete.bat are also provided. The runtime dependencies (openai, anthropic, rich, and their pinned transitive packages) live in src/venv_requirements.txt.

4. 🚀 Usage

Set your API key, then run from src/ (with the virtual environment active):

:: The shipped config.toml selects Anthropic, so set your Claude key.
:: For the OpenAI backend, set OPENAI_API_KEY instead and set [provider].name = "openai".
set ANTHROPIC_API_KEY=sk-ant-...     :: or: $env:ANTHROPIC_API_KEY = "sk-ant-..." in PowerShell
run.bat                              :: or: python main.py

The app prints a banner (application, provider, model, parameters, and the system-prompt source), optionally greets you, then enters the chat loop. Type to converse; type a slash-command to control the session. On exit, the transcript is written to the next free chat_log/chat_log_N.txt.

5. ⚙️ Configuration

All behaviour is tunable from data/config.toml. Every key is optional and merged over built-in defaults, so a missing file, section, or key falls back cleanly. Key sections:

SectionKeysPurpose
[application]agent_name_user, agent_name_ai, introduction_behaviorTerminal labels and the startup introduction mode (none / unprompted / prompted).
[provider]nameBackend registry key: openai or anthropic. The built-in default is openai; the shipped config.toml selects anthropic.
[model]name, max_tokens, temperature, streamingModel identifier and request parameters. (Some Claude models ignore temperature and use an effort level instead.)
[rendering]rich_enabledToggle Markdown rendering vs. a plain-text fallback.
[colors]general, header, field_value, ai_prompt, ai_text, user_prompt, user_textRich colour for each kind of terminal output (palette name, color(N), hex #rrggbb, or rgb(r,g,b)).
[prompts]system_prompt, introduction_prompt, introduction_responsePaths to the prompt assets.
[logging]level, file_enabled, directory, token_trackingLog verbosity, the rotating file log, and optional token-usage logging.
[chat_log]directory, file_prefix, file_extension, include_system_promptWhere and how transcripts are saved.

Out-of-range or invalid values are rejected in favour of the default and reported as a warning, so the app never crashes on a bad config.

6. ⌨️ Commands

Commands are prefixed (default /) so they are never confused with conversational input, and are matched case-insensitively:

CommandAliasesEffect
/exit/stopExit the application (saves the chat log).
/clear-Clear the terminal.
/help-List the available commands.
/system-Print the active system prompt.
/save-Save the chat log now, without exiting.
/reset-Clear the conversation history, keeping the system prompt.

7. 🧪 Tests

The project ships an automated pytest suite under tests/ that runs fully offline. A fake provider stands in for any backend, so no API key or network is required, and no real chat logs or diagnostic logs are written.

cd src
pip install -r test_requirements.txt    :: pytest + coverage (dev only)
test.bat                                 :: or: python -m pytest ../tests

8. 📜 License

Released under the MIT License - Copyright © 2024 Rohin Gosling.

Claude Skills Market Place

GitHub

Claude Code Python

Claude Code plugin marketplace. A curated collection of my publicly-shared Agent Skills, each packaged as an installable plugin.

📑 Table of Contents

📦 Install

These are Claude Code plugins, distributed through this repository acting as a plugin marketplace. Installing is two ideas: add the marketplace once, then install the plugins you want from it. If you have never installed a skill before, follow the steps below verbatim: each command is typed at the Claude Code prompt (the /-commands) or in a terminal (the claude … commands).

The marketplace id is rohingosling-skills. Every plugin is installed as <plugin-name>@rohingosling-skills: the plugin’s name (from the table below) plus @ plus that id.

1. Add the marketplace (once)

At the Claude Code prompt:

/plugin marketplace add rohingosling/claude-skills

This registers the catalog. You only do this once per machine; afterwards every plugin below is available to install.

2. Install the plugins you want

Install one: name the plugin, @, then the marketplace id:

/plugin install g-render-ascii-memory-map@rohingosling-skills

Install several: run the install line once per plugin:

/plugin install g-render-ascii-dependency-graph@rohingosling-skills
/plugin install g-render-ascii-hierarchy-diagram@rohingosling-skills

Install all of them: one line per plugin in the Available plugins table:

/plugin install g-render-ascii-dependency-graph@rohingosling-skills
/plugin install g-render-ascii-hierarchy-diagram@rohingosling-skills
/plugin install g-render-ascii-memory-map@rohingosling-skills

3. Activate and use

/reload-plugins

/reload-plugins makes newly installed plugins available in the current session (a brand-new session picks them up automatically). Then invoke any skill with its plugin-name:skill-name command. See Skill invocation.

Browse and manage interactively

Prefer a menu to typing commands? Run:

/plugin

…then use the Marketplaces and Installed tabs to browse, install, enable, disable, or remove plugins. There is no need to remember each plugin’s name.

From a terminal, without the prompt

Everything above is also a normal CLI, handy for a first install or for scripting. The terminal verbs mirror the prompt commands:

claude plugin marketplace add rohingosling/claude-skills
claude plugin install g-render-ascii-memory-map@rohingosling-skills   # repeat per plugin
claude plugin list                                             # confirm what is installed

After a terminal install, run /reload-plugins (or start a new session) to pick the plugins up.

Note: The g- prefix refers to global.

🧩 Available plugins

GroupPluginWhat it does
ASCII renderingg-render-ascii-dependency-graphRender an ASCII dependency graph from a JSON structure (horizontal/vertical links, ellipsis markers) for embedding in markdown documentation.
ASCII renderingg-render-ascii-hierarchy-diagramGenerate a hierarchical ASCII tree diagram from a JSON structure (folder trees, decomposition diagrams) with aligned comments and two layout modes.
ASCII renderingg-render-ascii-memory-mapRender an ASCII box-drawing memory map (address-space layout diagram) from a JSON structure for any architecture: Commodore, x86 segmented, ARM/MCU, or flat 32/64-bit, with multiple address formats and size-proportional block heights.

Skill invocation

Once a plugin is installed, invoke its skill at the Claude Code prompt as plugin-name:skill-name:

/g-render-ascii-dependency-graph:ascii-dependency-graph
/g-render-ascii-hierarchy-diagram:ascii-hierarchy-diagram
/g-render-ascii-memory-map:ascii-memory-map

Each skill wraps a dependency-free Python script under its skills/<skill>/scripts/ directory that can also be run directly (python3 on macOS/Linux, python on Windows).

More skills will be added over time.

🎨 Showcase

Some of the more visual skills are showcased here, starting with the ASCII rendering plugins. Each turns a small JSON description into clean, monospace-aligned art ready to paste straight into your docs, or output to your terminal.

g-render-ascii-dependency-graph

Nodes link horizontally (right) and vertically (bottom), with an optional · · · ellipsis for truncated branches.

{
    "name": "WebApp",
    "right": { "name": "API Server", "right": { "name": "Router" } },
    "bottom": [
        { "name": "Auth Service", "right": { "name": "JWT" } },
        { "name": "Database", "right": { "name": "Conn Pool" } },
        { "ellipsis": true }
    ]
}
┌─────────┐   ┌─────────────┐   ┌─────────┐
│ WebApp  ├──>│ API Server  ├──>│ Router  │
└────┬────┘   └─────────────┘   └─────────┘
     │   ┌───────────────┐   ┌─────┐
     ├──>│ Auth Service  ├──>│ JWT │
     │   └───────────────┘   └─────┘
     │   ┌───────────┐   ┌───────────┐
     ├──>│ Database  ├──>│ Conn Pool │
     │   └───────────┘   └───────────┘
     ·
     ·
     ·

g-render-ascii-hierarchy-diagram

A hierarchy with aligned trailing comments, perfect for folder structures and decomposition diagrams.

{
    "name": "my-service",
    "children": [
        { "name": "src", "comment": "Application code", "children": [
            { "name": "main.py", "comment": "Entry point" },
            { "name": "api", "comment": "HTTP route handlers" },
            { "name": "db", "comment": "Persistence layer" } ] },
        { "name": "tests", "comment": "Test suite", "children": [
            { "name": "test_api.py", "comment": "Route tests" } ] },
        { "name": "README.md", "comment": "Project overview" }
    ]
}
my-service
├─ src               Application code
│  ├─ main.py        Entry point
│  ├─ api            HTTP route handlers
│  └─ db             Persistence layer
│
├─ tests             Test suite
│  └─ test_api.py    Route tests
│
└─ README.md         Project overview

g-render-ascii-memory-map

An address-space layout diagram: boundary addresses in the left gutter, region labels inside each box, and notes outside, arrow-anchored. Block heights are size-proportional (here the 12 KB free-RAM region is visibly taller than its 1–2 KB neighbours), and --show-size annotates each region with its computed size.

{
    "title": "C64: VIC bank 0 ($0000-$3FFF)",
    "blocks": [
        { "start": "$0000", "end": "$03FF", "label": "zero page / stack / system",
          "comments": [ "$0001 CHAREN: bit 2 = 0 → char ROM" ] },
        { "start": "$0400", "end": "$07FF", "label": "screen RAM (video matrix)",
          "comments": [ "$D018 bits 4-7 = %0001" ] },
        { "start": "$0800", "end": "$37FF", "label": "free RAM" },
        { "start": "$3800", "end": "$3FFF", "label": "custom charset (2 KB)",
          "comments": [ "$D018 bits 1-3 = %111" ] }
    ]
}
C64: VIC bank 0 ($0000-$3FFF)

 $0000  ┌────────────────────────────┐
        │ zero page / stack / system │ ◄─ $0001 CHAREN: bit 2 = 0 → char ROM
        │ (1 KB)                     │
 $0400  ├────────────────────────────┤
        │ screen RAM (video matrix)  │ ◄─ $D018 bits 4-7 = %0001
        │ (1 KB)                     │
 $0800  ├────────────────────────────┤
        │ free RAM                   │
        │ (12 KB)                    │
        │                            │
        │                            │
        │                            │
        │                            │
 $3800  ├────────────────────────────┤
        │ custom charset (2 KB)      │ ◄─ $D018 bits 1-3 = %111
        │ (2 KB)                     │
        └────────────────────────────┘

📄 License

Released under the MIT License, copyright © 2026 Rohin Gosling.

Taumax - UCI Chess Engine

GitHub

Rust Cargo UCI

Taumax running in Arena
Taumax vs. random-move reference engine, after 10-game tournament (8 wins, 2 draws).

Taumax is a UCI-compliant chess engine written in Rust, that explores the ideas expressed by Alex Wissner-Gross’s, causal entropic intelligence equation.

F=T∇Sτ\mathbf{F} = T \nabla S_{\tau}

The goal of Taumax is not to be a strong chess engine, but instead, to explore ways in which causal entropy may be applied to an adversarial context, like the game of Chess.

📚 Contents


✅ Requirements

  • To run Taumax, all you need is a UCI compatible Chess UI. For example, Arena.
  • To build from source, you will need Rust, and Cargo.

Note: The engine has no graphical interface, opening book, tablebase support, network service, async runtime, or GPL dependency.


🏟️ Install In Arena

  1. Download the release executable, or build from source.
  2. Open Arena.
  3. Install a new engine.
  4. Select taumax.exe, or target\release\taumax.exe if you built from source.
  5. Choose UCI if Arena asks for the protocol.
  6. Open the engine configuration dialog and set any Taumax options you want to use.
  7. Start a game or analysis session.

Arena launches Taumax as a command-line UCI process. Commands flow into standard input, and protocol responses such as uciok, readyok, info string, and bestmove flow back through standard output.


⚙️ Engine Options

Taumax advertises its configurable options during the UCI handshake. Arena shows these in the engine configuration dialog.

OptionTypeDefaultMeaning
StrategycomboRandomSelects Random or RelativeCausalEntropy
Max Depthspin6Maximum relative-future horizon in plies
Random SeedstringemptyOptional deterministic seed for reproducible random-control runs
Diagnostics TracecheckfalseEmits score and profile diagnostics through UCI info string lines
GPU AccelerationcheckfalseRequests optional GPU leaf evaluation with CPU fallback

Example Arena-style configuration commands:

setoption name Strategy value RelativeCausalEntropy
setoption name Max Depth value 5
setoption name Diagnostics Trace value true
setoption name GPU Acceleration value true

GPU Acceleration is always available in the current taumax.exe. Leave it unchecked for normal CPU leaf evaluation, or check it to request GPU leaf evaluation with automatic CPU fallback.

The UCI go depth N limit is also supported. When both go depth and Max Depth are present, RelativeCausalEntropy uses:

τeff=min⁡(τmax⁡,Ngo)\tau_{\mathrm{eff}} = \min(\tau_{\max}, N_{\mathrm{go}})

where Max Depth is the GUI-configured cap and N_go is the depth supplied by the go command.

go searchmoves ... restricts candidate root moves, and go movetime N creates a cooperative search deadline. The stop command uses the same cancellation path.


🔌 Supported UCI Commands

CommandBehavior
uciPrints engine identity, option lines, and uciok
isreadyPrints readyok
ucinewgameResets the session to the starting position
position startposSets the board to the standard starting position
position startpos moves ...Sets the start position and applies each UCI move
position fen ...Sets the board from FEN
position fen ... moves ...Sets the FEN position and applies each UCI move
go ...Starts configured move selection and prints one legal bestmove
stopRequests cooperative cancellation and returns the best move found so far
debug on, debug offToggles diagnostic logging to standard error
setoption ...Applies known engine options and ignores unknown options for GUI compatibility
quitExits cleanly

Standard output is reserved for UCI protocol text. Diagnostics and debug messages go to standard error so chess GUIs never try to parse logs as engine responses.

Invalid position commands are rejected as a whole. The previous valid position is retained, and a diagnostic is written to standard error.


🛠️ Build From Source

From the project root, build the release executable:

cargo build --release

The Windows executable is created at:

target/release/taumax.exe

This single executable contains the full UCI option surface, including GPU Acceleration. The option defaults to false, so the engine uses CPU leaf evaluation unless the user enables GPU acceleration from the chess GUI.


🚀 GPU Acceleration

GPU acceleration is optional and default-off inside taumax.exe. Enable it from Arena or another UCI GUI by setting:

setoption name GPU Acceleration value true

GPU use is limited to the relative leaf-evaluation backend. Legal move generation, UCI handling, root move control, and most search orchestration remain CPU-side. If no compatible GPU backend is available, or if GPU execution fails, Taumax automatically falls back to CPU leaf evaluation.

Use Diagnostics Trace=true to see what happened:

info string tau profile strategy=RelativeCausalEntropy acceleration=serial-cpu leafBackend=gpu-batch gpuRequested=yes ...

gpuRequested=yes means the GUI requested GPU use. leafBackend=gpu-batch means GPU leaf work actually ran. leafBackend=cpu-batch means the request fell back to CPU.

GPU execution may not improve performance on every machine or position. The checkbox is a runtime request, not a guarantee that GPU work will run for every search.


🧠 How Move Selection Works

Taumax currently exposes two active strategies.

StrategyPurposeBehavior
RandomControl conditionUniformly selects one legal root move; reproducible when Random Seed is set
RelativeCausalEntropyCausal-entropic selectorScores legal root moves by future relative freedom after the opponent’s most restrictive reply

RelativeCausalEntropy does not use material values, piece-square tables, opening books, tablebases, trained networks, or hand-written tactical motifs. It measures legal action-space structure instead.

The selector estimates future freedom using:

  • Taumax legal-move mobility.
  • Taumax per-piece mobility.
  • Opponent legal-move mobility as a future restriction pressure.
  • Opponent per-piece mobility as a finer restriction pressure.
  • A finite search horizon controlled by Max Depth and go depth.
  • An adversarial reply model where the opponent chooses the reply that minimizes Taumax’s future relative entropy.
  • Explicit terminal-state boundaries for checkmate, being checkmated, and stalemate.

The terminal policy is important. In an adversarial environment, checkmating the opponent is the strongest guarantee that the opponent cannot restrict future movement. Taumax therefore treats a checkmating terminal state as a high future-agency boundary, being checkmated as a low boundary, and stalemate or drawn terminal states as their own neutral boundary. These are game-ending agency conditions, not material scores or mate-distance heuristics.

With Diagnostics Trace=true, a relative search emits root-score lines and one profile line. The profile line shows the acceleration path, leaf backend, GPU request state, node and leaf counts, batch shape, terminal count, and elapsed microseconds.


🎯 Expected Gameplay Behavior

Because Taumax is maximizing a relative future-freedom estimate rather than chess material, it can look unusual compared with conventional engines.

You should expect:

  • Legal moves, not necessarily strong chess moves.
  • Central or piece-activating moves when they increase future mobility.
  • Captures when removing an opponent piece improves Taumax’s relative future freedom.
  • Rejected captures when the capture lets the opponent severely restrict Taumax afterward.
  • Moves that reduce the opponent’s future mobility even without winning material.
  • Terminal wins to be attractive because they remove the opponent’s future ability to restrict play.
  • Terminal losses to be strongly avoided when any agency-preserving alternative exists.
  • Stalemate to be treated differently from checkmate.

The useful question when watching Taumax is not “did it win material?” but “did this move preserve or expand Taumax’s future freedom while reducing the opponent’s ability to constrain it?”


♟️ Applying Causal Entropy to the Game of Chess

Alex Wissner-Gross’s causal entropic intelligence equation describes a force toward futures with greater causal entropy:

F=T∇Sτ\mathbf{F} = T \nabla S_{\tau}

Taumax applies the same idea to chess by treating the current board position as the state ss and each legal root move m∈M(s)m \in \mathcal{M}(s) as a possible direction from that state. The horizon τ\tau is the finite number of plies used to estimate future freedom.

After move mm is played, Taumax estimates the causal entropy of the resulting future:

Sτ(s,m)=H^τ(sm)S_{\tau}(s,m) = \widehat{H}_{\tau}(s_m)

Here, sms_m is the position reached by move mm, and H^τ(sm)\widehat{H}_{\tau}(s_m) is Taumax’s estimate of the future action space that remains available after adversarial replies within horizon τ\tau.

In the original equation, ∇Sτ\nabla S_{\tau} is the gradient of future entropy. Chess is discrete, so Taumax uses a move-wise entropy difference instead of a continuous spatial gradient:

ΔmSτ(s)=Sτ(s,m)−Bτ(s)\Delta_m S_{\tau}(s) = S_{\tau}(s,m) - B_{\tau}(s)

where Bτ(s)B_{\tau}(s) is the baseline future-freedom estimate for the root position. This gives each candidate move its own chess analogue of entropic force:

Fm=TΔmSτ(s)=T(Sτ(s,m)−Bτ(s))\begin{aligned} F_m &= T \Delta_m S_{\tau}(s) \\ &= T \left(S_{\tau}(s,m) - B_{\tau}(s)\right) \end{aligned}

Taumax then chooses from the legal moves with the greatest entropic pressure:

m∗∈arg⁡max⁡m∈M(s)Fmm^* \in \arg\max_{m \in \mathcal{M}(s)} F_m

In practical chess terms, SτS_{\tau} is future freedom, ∇Sτ\nabla S_{\tau} becomes the comparison between legal move directions, TT controls how strongly entropy differences shape preference, and F\mathbf{F} becomes the pressure toward moves that preserve or expand Taumax’s agency. Checkmate is treated as a high terminal boundary because it removes the opponent’s future action space; being checkmated is treated as a low terminal boundary; stalemate is treated as a distinct game-ending boundary.


🧭 Troubleshooting

SymptomWhat To Check
Arena does not show GPU AccelerationArena is loading an older executable; reload the current taumax.exe, or rebuild with cargo build --release and select target\release\taumax.exe
Arena shows only Strategy, Max Depth, Random Seed, and Diagnostics TraceArena is loading an older executable; remove the old engine entry and select the current taumax.exe
Arena still shows old Tau* option namesArena is loading an older executable; remove the old engine entry or point Arena to the current target\release\taumax.exe
GPU Acceleration=true still reports leafBackend=cpu-batchGPU execution was requested but unavailable or failed at runtime; Taumax falls back to CPU leaf evaluation
Search is slowLower Max Depth, use go depth, or try Random first
Moves look strangeThis is expected for causal-entropic move selection; inspect Diagnostics Trace=true output
No bestmove appearsCheck that Arena installed the engine as UCI, then reload the executable

📄 License

Released under the MIT License - Copyright (c) 2024 Rohin Gosling.

Tank vs UAP

GitHub

Assembly Machine Language 6502 Kick Assembler Commodore VIC-20

Tank vs UAP title screen on the Commodore VIC-20  Tank vs UAP gameplay on the Commodore VIC-20 -- three UAPs, an air explosion, and a falling bomb

See YouTube video, for recording with sound.


Tank vs UAP is a 6502 machine-language arcade game for the stock unexpanded Commodore VIC-20. Tank vs UAP was inspired by the original type-in BASIC game, Tank vs UFO, by Duane Later. The original type-in game, Tank vs “UFO”, could be found at the back of the VIC-20 user manual, along with a number of other games written by Duane Later.

Tank vs UAP retains the core sprit of Later’s original Tank vs UFO, a single screen 2D tank trundling back and forth on the ground, shooting aliens out of the sky and dodging their bombs, …but expanded, to offer a more arcade-like experience.

See also, Tank vs UFO 2.0: An assembly language rewrite of the D. Later’s original 1981, BASIC type-in, Tank vs UFO.

📑 Contents

🔎 Overview

Just like in the original Tank vs UFO, you control a tank that patrols a single ground line at the bottom of the screen. However, unlike the original game, this tank is battling UAPs, instead than UFOs. Because, it’s 2021, and the ODNI Preliminary Assessment says UFOs, are like, so 1981.

The main goal of Tank vs UAP was to create a pixel-smooth, arcade-style, interpretation of the original BASIC version of Tank vs UFO.

Features

FeatureDescription
Pixel SmoothPixel smooth graphics and animation.
Non-Blocking EventsNon-blocking animation events.
Aimed bombsEach bomb vectors from the firing UAP toward the tank centre, with the gradient clamped to ±1.0.
Crashing UAPsCrashing UAPs pose a collision threat to your tank.
Progressive difficultyThe number of simultaneous UAPs scales with score, from 1 up to a maximum of 4.
Surviving 4 UAPs is, challenging.
Arcade-Style ScoringArcade-Style score and high score.

🚀 Quick Start

Want to just play Tank vs UAP? Download the disk image from the v1.0 release:

FileDownloadUse case
tank-vs-uap.d64downloadRun in VICE, or load on a real VIC-20 via SD2IEC / Pi1541 / 1541

Run in VICE (unexpanded VIC-20):

xvic -memory none -autostart tank-vs-uap.d64

The -memory none flag is required. By default VICE enables a 3K RAM expansion, which relocates the BASIC start address and prevents the disk-loaded program from landing at $1001. Tank vs UAP targets the stock unexpanded machine, so the expansion must be switched off.

Run on real hardware (disk only):

LOAD "TANK-VS-UAP",8,1
RUN

🎮 Controls

Same game-play controls as Duane Later’s original Tank vs UFO.

KeyContextAction
ZIn gameMove the tank left while held (44 px/sec, PAL-calibrated).
CIn gameMove the tank right while held (44 px/sec).
BIn gameFire the tank gun vertically. Reloads for 250 ms before the next shot.
Any keyTitle screen (boot only)Start play.
Any keyGame-over screenStart a new game instantly (high score retained).

💾 Loading and Starting

Tank vs UAP is disk-only for now. Tape is, unfortunately, not ‘yet’ supported.

Real hardware (Commodore VIC-20)

Put tank-vs-uap.d64 on an SD2IEC, Pi1541, or 1541 Ultimate (or write it to a real floppy for a 1541 drive) as device 8, then at the BASIC prompt:

LOAD "TANK-VS-UAP",8,1
RUN

LOAD "*",8,1 also works, since the main program is the first file on the disk.

The VIC-20 must be unexpanded (no 3K / 8K RAM cartridge fitted), because the program is laid out for the stock memory map with the screen at $1E00 and the custom character set at $1400.

VICE: run from the disk image

Run the .d64 in xvic (the VIC-20 emulator in the VICE suite). From a terminal in the directory holding the disk image:

Windows (Command Prompt or PowerShell; use the full path to xvic.exe if VICE’s bin folder is not on PATH):

xvic.exe -memory none -autostart tank-vs-uap.d64

Linux / macOS:

xvic -memory none -autostart tank-vs-uap.d64

The -memory none flag is required. By default VICE enables a 3K RAM expansion, which relocates the BASIC start address and prevents the disk-loaded program from landing at $1001. Tank vs UAP targets the stock unexpanded machine, so the expansion must be switched off.

VICE: run from the .prg file

The bare tank-vs-uap.prg can be started directly, but the disk image must still be attached as drive 8. The game loads its code overlays and title banners from disk at boot. -autostartprgmode 1 injects the .prg straight into RAM and types RUN, leaving the drive free for those loads.

Windows:

xvic.exe -memory none -autostartprgmode 1 -8 dist\tank-vs-uap.d64 -autostart build\tank-vs-uap.prg

Linux / macOS:

xvic -memory none -autostartprgmode 1 -8 dist/tank-vs-uap.d64 -autostart build/tank-vs-uap.prg

📂 Project Structure

src/    6502 assembly source (Kick Assembler).

build/    Build output (tank-vs-uap.prg + code overlays) and pre-generated banner data needed to assemble: banner-*.prg, banner-layout.asm, banner-resident.asm.

dist/    Disk image (tank-vs-uap.d64). Disk only for now, no tape image 'yet'.

images/    Screenshots.

💻 Building From Source

The project builds with two tools, on Windows, Linux, or macOS:

ToolNeedsRole
Kick Assembler v5.xA Java runtime (Java 8+)Assembles src/ into the .prg binaries.
VICE 3.x-c1541 packs the .d64 disk image; xvic runs it.

On Windows, Kick Assembler is a plain KickAss.jar download and VICE is a zip whose bin folder holds c1541.exe and xvic.exe. On Linux, install VICE from your package manager. On macOS, brew install vice provides both binaries. The commands below assume KickAss.jar at an example location and c1541 / xvic reachable on PATH. Note: substitute your own paths as needed.

1. Assemble

Run from the project root. One invocation assembles the whole game: the main program plus all four disk-loaded code overlays. The -libdir build is required. build/ holds the pre-generated banner data files (banner-layout.asm, banner-resident.asm, and the three banner-*.prg bitmaps) that are committed to the repository and imported by the source; the -odir path must be absolute.

Windows (Command Prompt; in PowerShell replace %CD% with $PWD):

java -jar "%KICKASS_JAR%" src\tank-vs-uap.asm -libdir src -libdir build -odir "%CD%\build" -o "%CD%\build\tank-vs-uap.prg"

Linux / macOS:

java -jar ~/kickassembler/KickAss.jar src/tank-vs-uap.asm -libdir src -libdir build -odir "$PWD/build" -o "$PWD/build/tank-vs-uap.prg"

This writes tank-vs-uap.prg, overlay.prg, overlay2.prg, screens-overlay.prg, and resident.prg into build/.

2. Pack the disk image

c1541 formats a fresh disk and writes the program, the code overlays (single-letter disk names o / p / s / r), and the three title-screen banner bitmaps (t / a / c). Create dist/ first if it does not exist (mkdir dist).

Windows:

c1541 -format "tank vs uap,tu" d64 dist\tank-vs-uap.d64 -write build\tank-vs-uap.prg "tank-vs-uap" -write build\overlay.prg "o" -write build\overlay2.prg "p" -write build\screens-overlay.prg "s" -write build\resident.prg "r" -write build\banner-title.prg "t" -write build\banner-author.prg "a" -write build\banner-controls.prg "c"

Linux / macOS:

c1541 -format "tank vs uap,tu" d64 dist/tank-vs-uap.d64 \
      -write build/tank-vs-uap.prg      "tank-vs-uap"    \
      -write build/overlay.prg          "o"              \
      -write build/overlay2.prg         "p"              \
      -write build/screens-overlay.prg  "s"              \
      -write build/resident.prg         "r"              \
      -write build/banner-title.prg     "t"              \
      -write build/banner-author.prg    "a"              \
      -write build/banner-controls.prg  "c"

3. Run

xvic -memory none -autostart dist/tank-vs-uap.d64

🙋‍♂️ Acknowledgements

AuthorTool / Source
Duane LaterOriginal type-in BASIC version of Tank vs UFO. The inspiration for this game.
Mads NielsenKick Assembler
The VICE TeamVICE

📄 License

Released under the MIT License - Copyright © 2021 Rohin Gosling.